Develop your own cryptocurrency with Substrate PART 1
In this blog post I will guide you through the process of implementing an ERC20 token with use of a smart contract on a Substrate node and accessing it from a NestJS application. If you would like to get a basic concept of what blockchain, Substrate or smart contracts are you may check our previous blog post. NestJS is a framework for building Node.js applications, to get the basics you can visit it's documentation website.
You can access the working project on GitHub.
Substrate node
First of all we need a local substrate node. To have it on your computer it is best to complete the Create your first substrate chain tutorial from substrate.dev.
To be able to deploy a smart contract to the node, we need to add the Contracts Pallet. To do it, please check out this tutorial. If you would like to skip this part, clone this tutorial's repo instead of the Substrate Node Template repo.
Run the Substrate node
If you decided to omit adding a Contracts Pallet on your own, you need to build the node. cargo is a package manager for Rust, which you should already have on your computer after completing Create your first substrate chain tutorial.
cargo build --release
Purge the chain and run it in development mode with the following commands:
./target/release/node-template purge-chain --dev
./target/release/node-template --dev
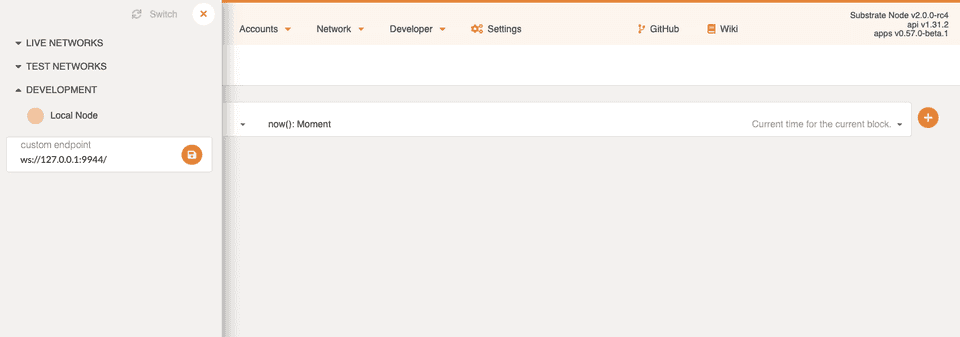
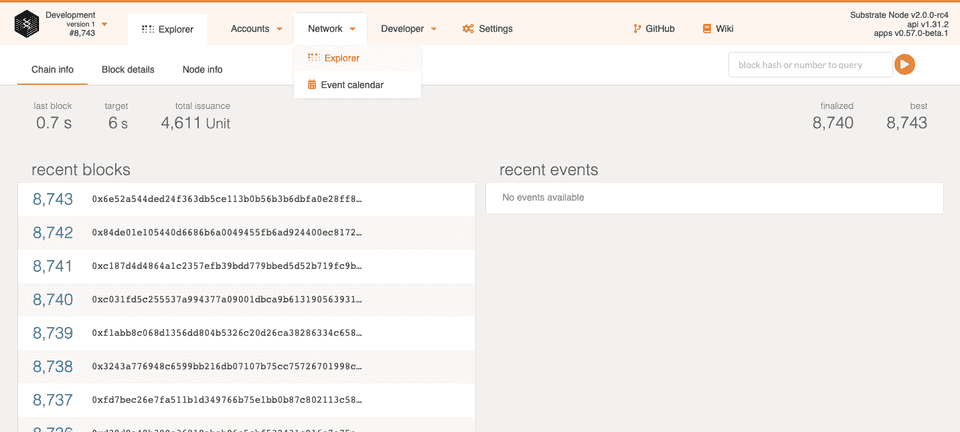
To make sure your chain is up and running you can use the Polkadot JS Apps. To run the app you need a Chromium based browser (other browsers will not allow you to connect to the local node). You can expand the list of available chains by clicking on the Substrate logo in the upper left corner. Expand DEVELOPMENT list and choose the Local Node.

To see if the Contracts Pallet was successfully added, check that you have the Contracts -> Developer page available.

ERC20 token Smart Contract
ERC20 is the Ethereum token standard used for Ethereum Smart Contracts. It defines an interface for a simple cryptocurrency. Users can transfer tokens they own or allow other users to transfer some amount of tokens on their behalf.
To build your own ERC20 token contract you can complete another tutorial available here. The first part will guide you through the basics of smart contract creation. The second part is strictly focused on the ERC20 token implementation.
If you decide to skip this part, you can get the code from the repository for this tutorial.
Build the contract
Once you have the code of ERC20 ready you need to build and deploy it to the Substrate chain. If you have completed the tutorial from the previous point, you probably are already familiar with the process. If you haven't but still wish to build the contract on your own, you will need to install the ink! command line utility. You can also skip it and use the .wasm binary and metadata files uploaded to this post's repository and go straight to deploying the contract to the chain.
Install the ink! command line utility.
cargo install cargo-contract --vers 0.6.2 --force
Build the contract with the following command, which will create a .wasm file.
cargo +nightly contract build
Generate metadata json file, which describes the smart contract.
cargo +nightly contract generate-metadata
Deploy contract to the chain
To deploy the contract, check the Deploying your contract chapter from the tutorial. When creating an instance of the contract, we need to pass the initial supply value, i.e. 1 000 000.
Connecting from NestJS app
Now we are ready to communicate with our smart contract. There are several ways to do this. One obvious way would be to use the Polkadot JS Apps. This is a great way to play with your contract and explore it. Another way would be to clone the Parity’s Substrate Front End Template from GitHub, run it, and adapt to your needs. We will however connect from NestJS. It would enable us to wrap the calls to the blockchain with some user-friendly stuff as well as store any additional descriptive information, which we shouldn’t put on-chain.
Check our previous blog post describing in detail how to connect to a Substrate node and query it for some basic data. Here is a shortcut.
First of all, we need to create a new NestJS project. If you do not have the Nest CLI installed you can check the docs here or just install it with a following command:
npm install -g @nestjs/cli
Now you can create a new project.
nest new substrate-nests
Change directory and run the app.
cd substrate-nests
yarn start:dev
Add Polkadot api library to interact with the Substrate node:
yarn add @polkadot/api
For the lib to work correctly, add the following to your tsconfig.json.
"esModuleInterop": true
Add Polkadot api-contract library to interact with the Contracts Pallet.
yarn add @polkadot/api-contract
It is also possible that you will need another version of Node.js. You can use Node Version Manager to manage different versions.
Connect to the node
We will add a ContractService to interact with the smart contract. This service will implement the OnModuleInit interface.
@Injectable()
export class ContractService implements OnModuleInit {
    async onModuleInit() {
    }
}
In the onModuleInit() function we will create the connections to the api. First of all we need to create a WebSocket Provider with the url of our node. As we are using a local node it simply is localhost.
const SUBSTRATE_URL = 'ws://127.0.0.1:9944';
const wsProvider = new WsProvider(SUBSTRATE_URL);
Next, we will create the ApiPromise object using the web socket provider. We need to declare a class scoped variable:
private api: ApiPromise;
We can instantiate it in the onModuleInit function:
this.api = await ApiPromise.create({
        provider: wsProvider,
        types: {
        "Address": "AccountId",
        "LookupSource": "AccountId"
      }

    });
We will now create a PromiseContract object from the api-contract library. This object is tightly connected with the contract we have created so we need some more information about it. We need the contract address. To get it, visit Polkadot JS Apps. Select Developer -> Contracts from the main menu, then select the Contracts tab. Clicking on the image next to the contract name (here it is ERC20.WASM (INSTANCE)) will copy the contract’s address to clipboard.

We can put it in a constant:
const ERC20 = '5DhP1rd5AEZCeZY77Zttbt293rX6tX4QnqEajEMd5i1QKsnB'
Now we need to create an Abi object which includes the smart contract’s definitions. Copy the metadata.json file generated in the previous step (deploying the smart contract) into the src directory and import it:
import metadata from "./metadata.json";
Add a property to your tsconfig.json file to enable importing JSON files.
"resolveJsonModule": true,
Declare class variables:
private abi: Abi;
private apiContract: PromiseContract;
Instantiate the objects:
const abiJSONobj = (<any>metadata);
this.abi = new Abi(this.api.registry, abiJSONobj);
this.apiContract = new PromiseContract(this.api, this.abi, ERC20);
We can also wait until we are connected to the node.
await this.api.isReady;
What we have done so far should look somehow like the following:
// src/contract.service.ts
import { Injectable, Logger, OnModuleInit } from '@nestjs/common';
import { ApiPromise, WsProvider } from '@polkadot/api';
import { Abi, PromiseContract } from '@polkadot/api-contract';
import metadata from "./metadata.json";

const SUBSTRATE_URL = 'ws://127.0.0.1:9944'
const ERC20 = '5DhP1rd5AEZCeZY77Zttbt293rX6tX4QnqEajEMd5i1QKsnB'

@Injectable()
export class ContractService implements OnModuleInit {
  private api: ApiPromise;
  private abi: Abi;
  private apiContract: PromiseContract;

  async onModuleInit() {
    Logger.log('Connecting to substrate chain...');
    const wsProvider = new WsProvider(SUBSTRATE_URL);
    this.api = await ApiPromise.create({
      provider: wsProvider,
      types: {
        "Address": "AccountId",
        "LookupSource": "AccountId"
      }

    });

    const abiJSONobj = (<any>metadata);
    this.abi = new Abi(this.api.registry, abiJSONobj);
    this.apiContract = new PromiseContract(this.api, this.abi, ERC20);

    await this.api.isReady;
  }
}
Total supply
We can now query the node for the total supply of our token. We are going to use the call() function from the PromiseContract class.
Let’s take a look at the definition of the function:
call(as: 'rpc', message: string, value: BN | number, gasLimit: BN | number, ...params: any[]): ContractCall<ApiType, 'rpc'>;
call(as: 'tx', message: string, value: BN | number, gasLimit: BN | number, ...params: any[]): ContractCall<ApiType, 'tx'>;
as-txstring value is used for a transaction call. For a read-only request, we can userpc.message- name of the smart contract’s function we want to call.value- you can transfer some basic units alongside sending a transaction, but we will not use it, so the value will always be 0.gasLimit- the maximum value of gas this call can charge your account. Every transaction call of a smart contract is in general charged with a gas fee for the computational resources used. With an RPC call, we still need to provide a valid gas limit value, but as nothing is actually stored on-chain, you will not be charged. Previously, you were to define a conversion rate between the gas price and the Substrate currency for the Contracts Pallet (which is also the case for Ethereum smart contracts). Now it is fixed:1 gas = 1 weight = 1 ps.weightis a unit used in Substrate Runtime development to set the fee for calling the functions andpsis one picosecond of execution on the reference system.params- parameters to pass to the smart contract’s function we want to call.
The call() function creates a ContractCall, which exposes a send() function:
send(account: IKeyringPair | string | AccountId | Address): ContractCallResultSubscription<ApiType, CallType>;
We need to specify the account, which is going to call a function. For the readonly calls it is enough to pass the account’s address. To make things simple, we will use Alice predefined account:
const ALICE = '5GrwvaEF5zXb26Fz9rcQpDWS57CtERHpNehXCPcNoHGKutQY'
In the code snippet below we call the totalSupply function (which does not have any parameters so we can omit the params) and send it as Alice.
async totalSupply() {
    const result: ContractCallOutcome = await this.apiContract.call('rpc', 'totalSupply', 0, 1000000000000)
      .send(ALICE) as ContractCallOutcome
    return result.output.toString()
  }
An important note on the gas limit value. When you were initializing the contract with Polkadot JS Apps, maximum gas limit of 1 000 000 was enough. Here we pass six more zeros. This is because under the hood Polkadot JS Apps multiplies the value of gas limit by 10^6.
Now we can create a controller to expose the function. In the src directory create a file balances.controller.ts. Set the controller route, inject ContractService and create a function totalSupply decorated with @Get which calls the contractService.totalSupply() function.
// src/balances.controller.ts
import { Controller, Get } from '@nestjs/common';
import { ContractService } from './contract.service';

@Controller('balances')
export class BalancesController {
  constructor(private readonly contractService: ContractService) {}

  @Get()
  async totalSupply(): Promise<string> {
    console.log('totalSupply')
    const data = await this.contractService.totalSupply();
    return `${data}`;
  }
}
Add the service and the controller to the app module.
// src/app.module.ts
import { Module } from '@nestjs/common';
import { AppController } from './app.controller';
import { AppService } from './app.service';
import { BalancesController } from './balances.controller';
import { ContractService } from './contract.service';

@Module({
  imports: [],
  controllers: [AppController, BalancesController],
  providers: [AppService, ContractService],
})
export class AppModule {}
You can now check the result in a browser.

When I have deployed my smart contract through the Polkadot JS Apps, I set the init supply to 1 000 000. Each currency value is a decimal stored as an integer with a fixed and known number of decimal places (in Substrate Node Template it is 15 by default). Polkadot JS Apps wraps that for you in the input field, so that I have indeed initialized the contract with one million units. However, when querying the smart contract through the Polkadot JS Apps or using the api we always get the additional 15 decimal zeros.
Balance of an account
Another snippet shows how to call the balanceOf function. The only difference is that we need to pass the parameter to specify whose balance we are asking of.
async balanceOf(who: string) {
    const result: ContractCallOutcome = await this.apiContract.call('rpc', 'balanceOf', 0, 1000000000000, [who])
      .send(ALICE) as ContractCallOutcome
    return result.output.toString()
  }
And a corresponding function in the controller:
@Get(':id')
  async balanceOf(@Param() params): Promise<string> {
    console.log('balanceof ' + params.id)
    const data = await this.contractService.balanceOf(accounts[params.id]);
    return `${data}`;
  }
To easily interact with the api from a browser, we can create a list of the predefined account’s addresses:
const accounts = {
  ALICE: '5GrwvaEF5zXb26Fz9rcQpDWS57CtERHpNehXCPcNoHGKutQY',
  BOB: '5FHneW46xGXgs5mUiveU4sbTyGBzmstUspZC92UhjJM694ty',
  CHARLIE: '5FLSigC9HGRKVhB9FiEo4Y3koPsNmBmLJbpXg2mp1hXcS59Y',
  DAVE: '5DAAnrj7VHTznn2AWBemMuyBwZWs6FNFjdyVXUeYum3PTXFy',
  EVE: '5HGjWAeFDfFCWPsjFQdVV2Msvz2XtMktvgocEZcCj68kUMaw',
}
Transfer
As we already know how to read data from our smart contract, it is time to make a transaction.
To sign a transaction alongside sending it, we need to pass a KeyringPair instead of the account's address. As we are in development mode, we will use the predefined Alice account again, so creating a KeyringPair is fairly simple:
const keyring = new Keyring({ type: 'sr25519' });
this.alice = keyring.addFromUri('//Alice', { name: 'Alice default' });
To get a deeper understanding of the keyring concept please visit Polkadot JS API reference.
There are two ways to call the transfer function. One would be to use the apiContract.call() function with the first parameter set to tx.
async transfer(to: string, value: number) {
    const extrinsicHash: SubmittableResult = await this.apiContract.call('tx', 'transfer', 0, 1000000000000, to, value)
      .send(this.alice) as SubmittableResult

    return extrinsicHash.toString();
  }
As a result of this function, we get the extrinsic hash. It is not the block hash, because the transaction was yet only submitted to the transaction query. The extrinsic hash alone is not unique over the chain, so we would prefer to know the block hash. apiContract.call() function does not expose a parameter to pass a callback function to observe the events. Therefore we will use a function from the basic Polkadot api this time.
call: AugmentedSubmittable<(dest: LookupSource | Address | AccountId | AccountIndex | string | Uint8Array, value: Compact<BalanceOf> | AnyNumber | Uint8Array, gasLimit: Compact<Gas> | AnyNumber | Uint8Array, data: Bytes | string | Uint8Array) => SubmittableExtrinsic<ApiType>>;
dest- this is the address we want to communicate with. As we want to make a call to the smart contract, we will set it to the smart contract's address.value- same as inApiContract.call()gasLimit- same as inApiContract.call()data- any data we want to put in the transaction, here it is the function call.
await this.api.tx.contracts.call(ERC20, 0, 1000000000000, this.abi.messages.transfer(to, value))
.signAndSend(this.alice, (result: SubmittableResult) => { Logger.log(result) })
We submit to the result and log it. We will see three events logged:
- an event upon transaction creation
- an event with status
InBlockand a block hash when the transaction is included in a block - an event with status
Finalizedwhen the transaction is finalized.
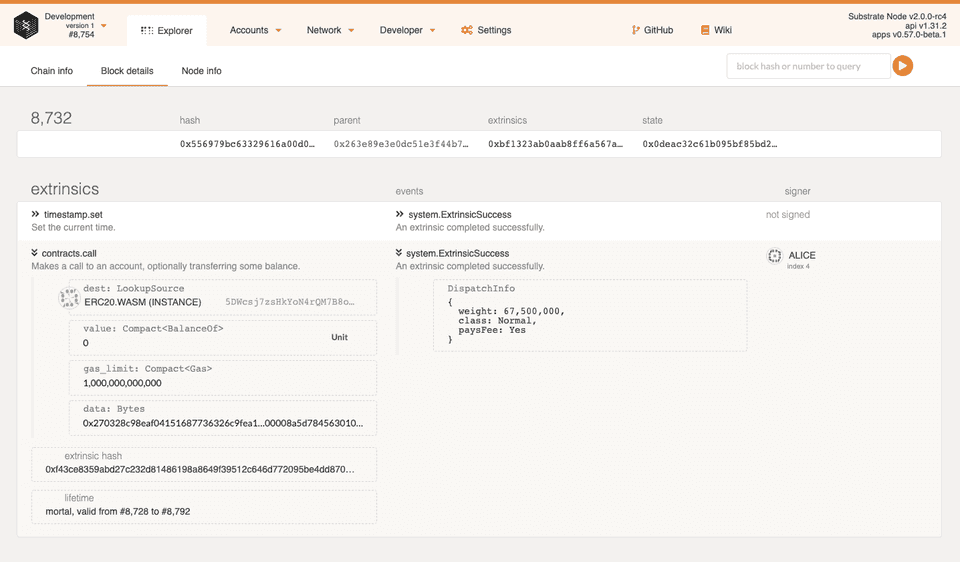
A finalized transaction does not mean a successful transaction. It only means that the processing of a transaction has finished. We can check in Polkadot JS Apps if the transaction is successful. Go to Network -> Explorer page and paste the transaction hash in the upper left corner input block hash or number to query.

You can explore the block details.

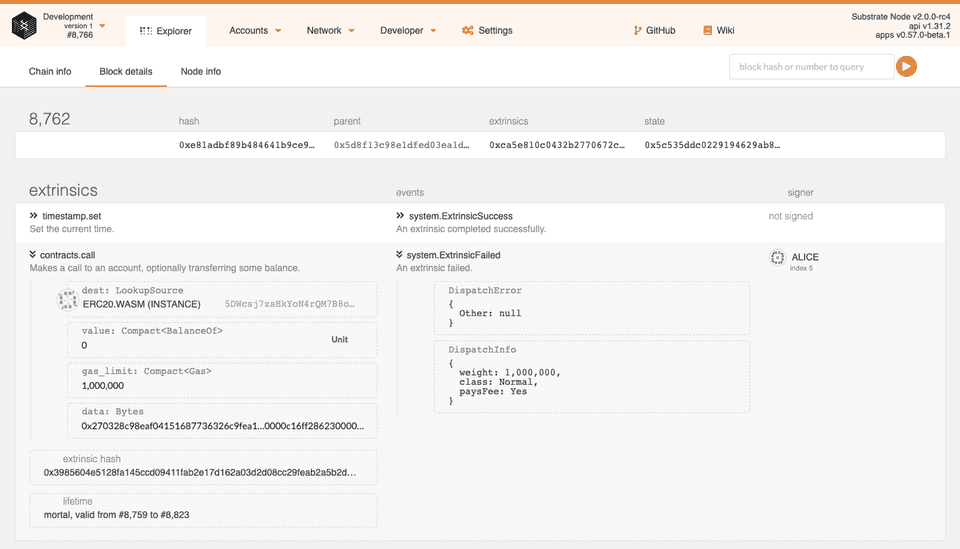
On the right side, you can see the events emitted by the smart contract. The last one says ExtrinsicSuccess, so we know the transaction was successful. You can try to submit a transaction with gasLimit = 0. Once the transaction is finalized, view its details. You can see the ExtrinsicFailed event.

The contract.service.ts file should look like this now:
// src/contract.service.ts
import { Injectable, Logger, OnModuleInit } from '@nestjs/common';
import { ApiPromise, Keyring, SubmittableResult, WsProvider } from '@polkadot/api';
import { Abi, PromiseContract } from '@polkadot/api-contract';
import { ContractCallOutcome } from '@polkadot/api-contract/types';
import { KeyringPair } from '@polkadot/keyring/types';
import metadata from "./metadata.json";

const SUBSTRATE_URL = 'ws://127.0.0.1:9944'
const ERC20 = '5DhP1rd5AEZCeZY77Zttbt293rX6tX4QnqEajEMd5i1QKsnB'
const ALICE = '5GrwvaEF5zXb26Fz9rcQpDWS57CtERHpNehXCPcNoHGKutQY'

@Injectable()
export class ContractService implements OnModuleInit {
  private api: ApiPromise;
  private abi: Abi;
  private alice: KeyringPair;
  private apiContract: PromiseContract;

  async onModuleInit() {
    Logger.log('Connecting to substrate chain...');
    const wsProvider = new WsProvider(SUBSTRATE_URL);
    this.api = await ApiPromise.create({
      provider: wsProvider,
      types: {
        "Address": "AccountId",
        "LookupSource": "AccountId"
      }
    });

    const abiJSONobj = (<any>metadata);
    this.abi = new Abi(this.api.registry, abiJSONobj);
    this.apiContract = new PromiseContract(this.api, this.abi, ERC20);

    await this.api.isReady;

    const keyring = new Keyring({ type: 'sr25519' });
    this.alice = keyring.addFromUri('//Alice', { name: 'Alice default' });
  }

  async transfer(to: string, value: number) {
    await this.api.tx.contracts.call(ERC20, 0, 1000000000000, this.abi.messages.transfer(to, value))
      .signAndSend(this.alice, (result: SubmittableResult) => { Logger.log(result) })
  }


  async balanceOf(who: string) {
    const result: ContractCallOutcome = await this.apiContract.call('rpc', 'balanceOf', 0, 1000000000000, who)
      .send(ALICE) as ContractCallOutcome
    return result.output.toString()
  }

  async totalSupply() {
    this.api.rpc.contracts.call
    const result: ContractCallOutcome = await this.apiContract.call('rpc', 'totalSupply', 0, 1000000000000)
      .send(ALICE) as ContractCallOutcome
    return result.output.toString()
  }

}
We can now add a transfer function to the controller and an interface for the request body.
interface TransferDto {
  to: string
  value: number
}
@Put()
@HttpCode(202)
async transfer(@Body() transferDto: TransferDto){
  await this.contractService.transfer(accounts[transferDto.to], transferDto.value);
}
The response code is 202 as the transaction was only accepted to proceed.
The balances.controller.ts file should look like this now:
// src/balances.controller.ts
import { Body, Controller, Get, HttpCode, Param, Put } from '@nestjs/common';
import { ContractService } from './contract.service';

// accounts list to easily interact with the API
const accounts = {
  ALICE: '5GrwvaEF5zXb26Fz9rcQpDWS57CtERHpNehXCPcNoHGKutQY',
  BOB: '5FHneW46xGXgs5mUiveU4sbTyGBzmstUspZC92UhjJM694ty',
  CHARLIE: '5FLSigC9HGRKVhB9FiEo4Y3koPsNmBmLJbpXg2mp1hXcS59Y',
  DAVE: '5DAAnrj7VHTznn2AWBemMuyBwZWs6FNFjdyVXUeYum3PTXFy',
  EVE: '5HGjWAeFDfFCWPsjFQdVV2Msvz2XtMktvgocEZcCj68kUMaw',
}

interface TransferDto {
  to: string
  value: number
}

@Controller('balances')
export class BalancesController {
  constructor(private readonly contractService: ContractService) { }

  @Get()
  async totalSupply(): Promise<string> {
    const data = await this.contractService.totalSupply();
    return `${data}`;
  }

  @Get(':id')
  async balanceOf(@Param() params): Promise<string> {
    const data = await this.contractService.balanceOf(accounts[params.id]);
    return `${data}`;
  }

  @Put()
  @HttpCode(202)
  async transfer(@Body() transferDto: TransferDto) {
    await this.contractService.transfer(accounts[transferDto.to], transferDto.value);
  }
}
Let's now do some transfers. We can use Postman for this.
We will transfer some units to Bob. As we sign all transactions as Alice, she will be the sender. We need to create a PUT request at http://localhost:3000/balances url and pass two body parameters: to: BOB and value: 1000000000000000000 (again, we have the 15 decimal zeros here, so we actually transfer 1 000 units).

Now let's check again the balances (I omit the decimal zeros here so that the numbers are more readable):
- total balance (http://localhost:3000/balances)\[http://localhost:3000/balances] - should not change and still be 1 000 000
- Alice's balance (http://localhost:3000/balances/ALICE)\[http://localhost:3000/balances/ALICE] - should be reduced by 1 000 to 999000
- Bob's balance (http://localhost:3000/balances/BOB)\[http://localhost:3000/balances/BOB] - should be 1 000.
Approval
We can now add the functions needed for the approval feature. There are two transactions to be handled: approving another account to make transfers for us up to a fixed amount and transferring on behalf. We can also query the chain for the allowances. Let's add three functions to the ContractService class.
async allowance(owner: string, spender: string) {
  const result: ContractCallOutcome = await this.apiContract.call('rpc', 'allowance', 0, 1000000000000, owner, spender)
    .send(ALICE) as ContractCallOutcome
  return result.output.toString()
}

async approve(spender: string, value: number) {
  await this.api.tx.contracts.call(ERC20, 0, 1000000000000, this.abi.messages.approve(spender, value))
    .signAndSend(this.alice, (result: SubmittableResult) => { Logger.log(result) })
}

async transferFrom(from: string, to: string, value: number) {
  await this.api.tx.contracts.call(ERC20, 0, 1000000000000, this.abi.messages.transferFrom(from, to, value))
    .signAndSend(this.alice, (result: SubmittableResult) => { Logger.log(result) })
}
To expose the allowance feature we can create another controller.
// src/allowances.controller.ts
import { Body, Controller, Get, HttpCode, Post, Query } from '@nestjs/common';
import { ContractService } from './contract.service';

// accounts list to easily interact with the API
const accounts = {
  ALICE: '5GrwvaEF5zXb26Fz9rcQpDWS57CtERHpNehXCPcNoHGKutQY',
  BOB: '5FHneW46xGXgs5mUiveU4sbTyGBzmstUspZC92UhjJM694ty',
  CHARLIE: '5FLSigC9HGRKVhB9FiEo4Y3koPsNmBmLJbpXg2mp1hXcS59Y',
  DAVE: '5DAAnrj7VHTznn2AWBemMuyBwZWs6FNFjdyVXUeYum3PTXFy',
  EVE: '5HGjWAeFDfFCWPsjFQdVV2Msvz2XtMktvgocEZcCj68kUMaw',
}

interface AllowanceDto {
  spender: string,
  value: number,
}

@Controller('allowances')
export class AllowancesController {
  constructor(private readonly contractService: ContractService) { }

  @Get()
  async allowance(@Query('owner') owner, @Query('spender') spender): Promise<string> {
    const data = await this.contractService.allowance(accounts[owner], accounts[spender]);
    return `${data}`;
  }

  @Post()
  @HttpCode(202)
  async approve(@Body() allowanceDto: AllowanceDto) {
    console.log(allowanceDto);
    await this.contractService.approve(accounts[allowanceDto.spender], allowanceDto.value);
  }
}
To handle transferring from another account, we can change the transfer() function of the BalancesController and the TransferDto interface.
interface TransferDto {
  from?: string
  to: string
  value: number
}
  @Put()
  @HttpCode(202)
  async transfer(@Body() transferDto: TransferDto) {
    if (transferDto.from !== undefined) {
      await this.contractService.transferFrom(accounts[transferDto.from], accounts[transferDto.to], transferDto.value);
    }
    else {
      await this.contractService.transfer(accounts[transferDto.to], transferDto.value);
    }
  }
We would like to allow Alice to send 200 units on behalf of Bob. Such a transaction should be signed by Bob, but our app does not enable choosing a signer. Let's then switch to Polkadot JS Apps. Go to Developer -> Contracts page, choose Contracts tab and click the execute button on the contract. Change the account, so that we will call the contract functions from Bob's account. Choose approve as a message to send. Choose Alice as a spender and set the value to 200 (no decimal zeros here!). Click the Call button, sign and submit the transaction (make sure that Bob is the signer).

We can check the allowance in the browser http://localhost:3000/allowances?owner=BOB&spender=ALICE to be 200.
Now let's go back to Postman and let Alice make a transfer from Bob's to Charlie's wallet. Remember to add the decimal zeros and to transfer less than the approved value. I decided to transfer 110.

We can now confirm that:
- http://localhost:3000/balances/CHARLIE - Charlie's balance is 110
- http://localhost:3000/balances/ALICE - Alice's balance is still 999000
- http://localhost:3000/balances/BOB - Bob's balance is reduced by 110 and now it's 890
- http://localhost:3000/allowances?owner=BOB&spender=ALICE - the approval is also reduced by 110 and now it's 90.
We can also use our api to allow Bob to transfer 100 units on behalf of Alice. We can create a POST request in Postman at http://localhost:3000/allowances url and pass two body parameters: sender: BOB and value: 100000000000000000 (again, we have the 15 decimal zeros).

We can check the allowance in the browser http://localhost:3000/allowances?owner=ALICE&spender=BOB to be 100.
We can now let Bob make a transfer of 30 units from Alice's to Dave's wallet using the Polkadot JS Apps:

We can now confirm that:
- http://localhost:3000/balances/DAVE - Dave's balance is 30
- http://localhost:3000/balances/ALICE - Alice's balance is reduced by 30 and it's 998970
- http://localhost:3000/balances/BOB - Bob's balance is is still 890
- http://localhost:3000/allowances?owner=ALICE&spender=BOB - the approval is also reduced by 30 and now it's 70.
Summary
We have run a local Substrate node with the Contracts Pallet added. We have implemented an ERC20 token smart contract and deployed it to the Substrate node. Finally, we have created a simple NestJS app to interact with the smart contract and tested it.
What's next?
In the next part of this tutorial we will:
