Your First iOS CI Pipeline in Azure DevOps
In this article I will guide you through creation of your first CI pipeline using Azure DevOps Platform.
Since I wrote my first test and run it on CI pipeline in one of my past projects I got hooked on the concept of Continuous Integration and Delivery (CI/CD). From that moment I tried to dip my fingers into sauce of automation whenever I could. Since then I have maintained and created many such CI/CD pipelines. Recently I got opportunity to prepare yet another one - this time in Azure DevOps and to my surprise it was really great experience.
I will not go deeper into the details of scripting side to build and test your code. Instead you can checkout article series form my colleague Artur who does just that:
- Build and Run iOS App Tests Locally with Fastlane
- Upload iOS App to TestFlight with GitHub Actions and Fastlane Match
- Build and Run iOS App Tests with GitHub Actions
TL;DR
Sorry, no sensible TL;DR today... You've come pretty far already though! If you are in a real rush however go and checkout example CI pipeline.
Yaml, yaml everywhere

Similarly to other CI/CD infrastructure providers like GitHub actions, Bitrise, TeamCity... Azure DevOps uses Yaml to define pipelines which creates our CI/CD setup. For creating such pipelines You may find YAML schema reference for Azure Pipelines to be a very handy link. In contrast to GitHub Actions - You don't need to have pipeline present on default repository branch. You need to however define it in the Azure DevOps UI. If one wishes - pipeline can be also fully "clicked through" in UI using "classic editor" however it seems not to be recommended way. I also feel that most developers would still prefer better control over pipeline by creating and maintaining YAML files themselves (at least I do).
Creating the pipeline
As stated above - all pipelines in Azure DevOps needs to be defined in UI. We will do just that and end up with yaml starter we will later on modify so it becomes actual CI pipeline.
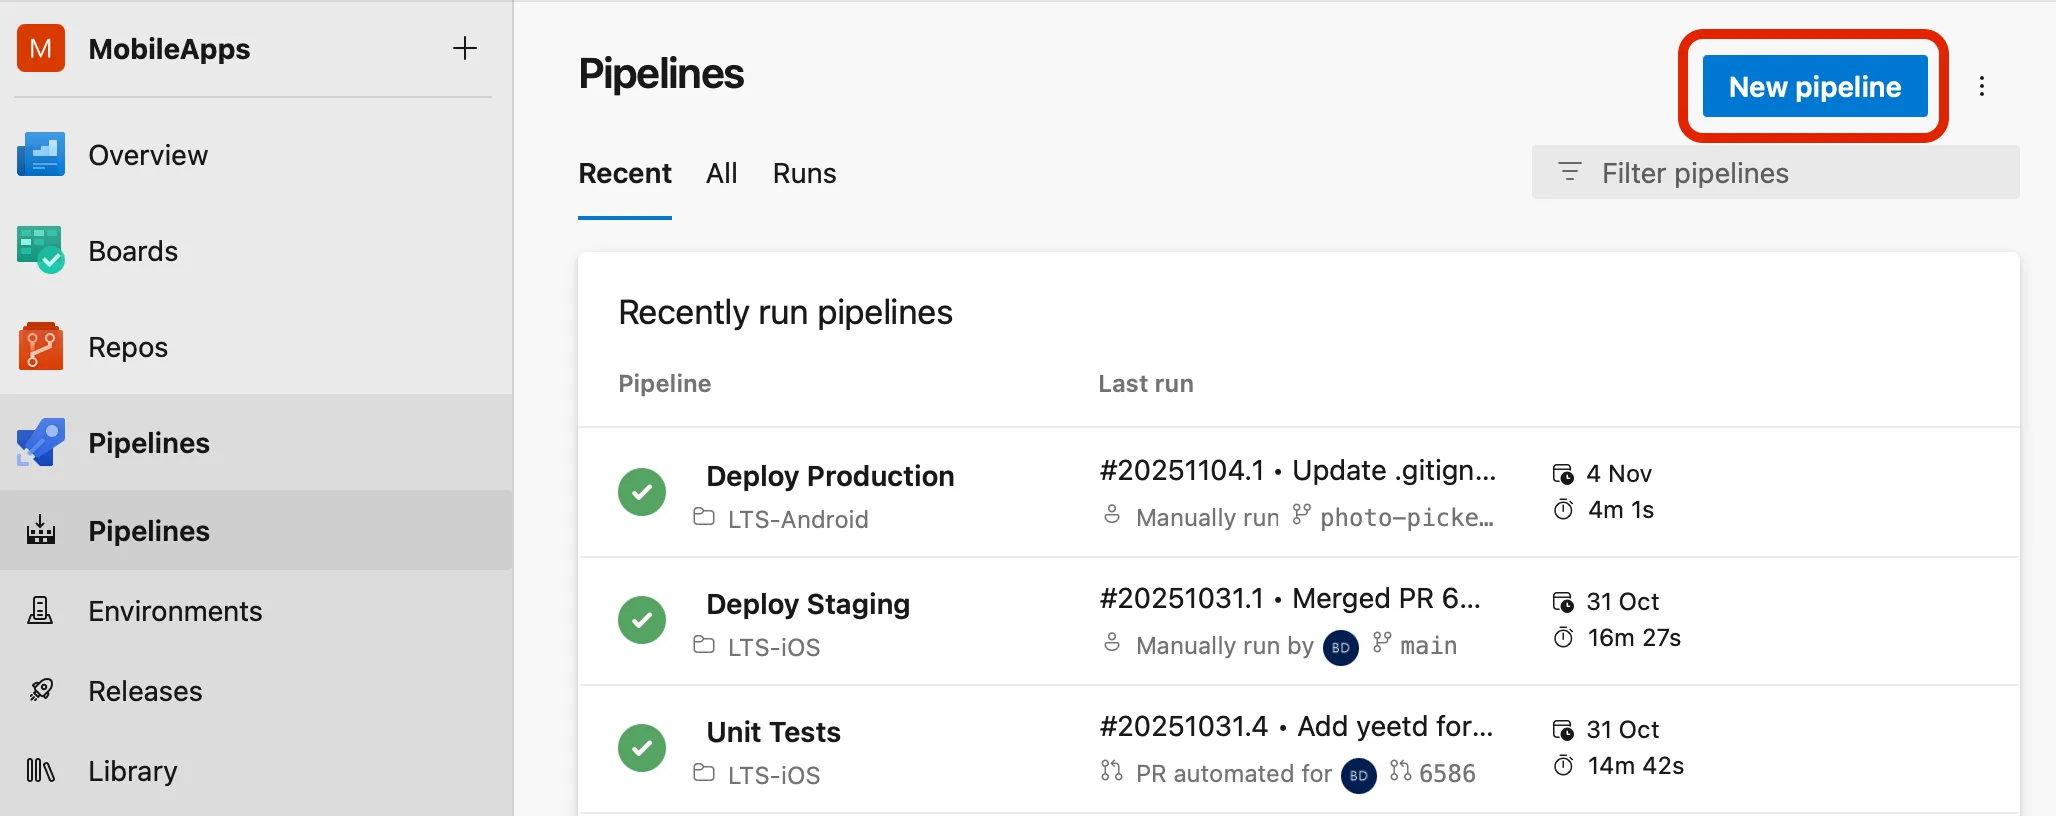
Firstly go to Your Azure DevOps Project, then navigate to: Pipelines -> Pipelines and click on New pipeline button in the top right corner.
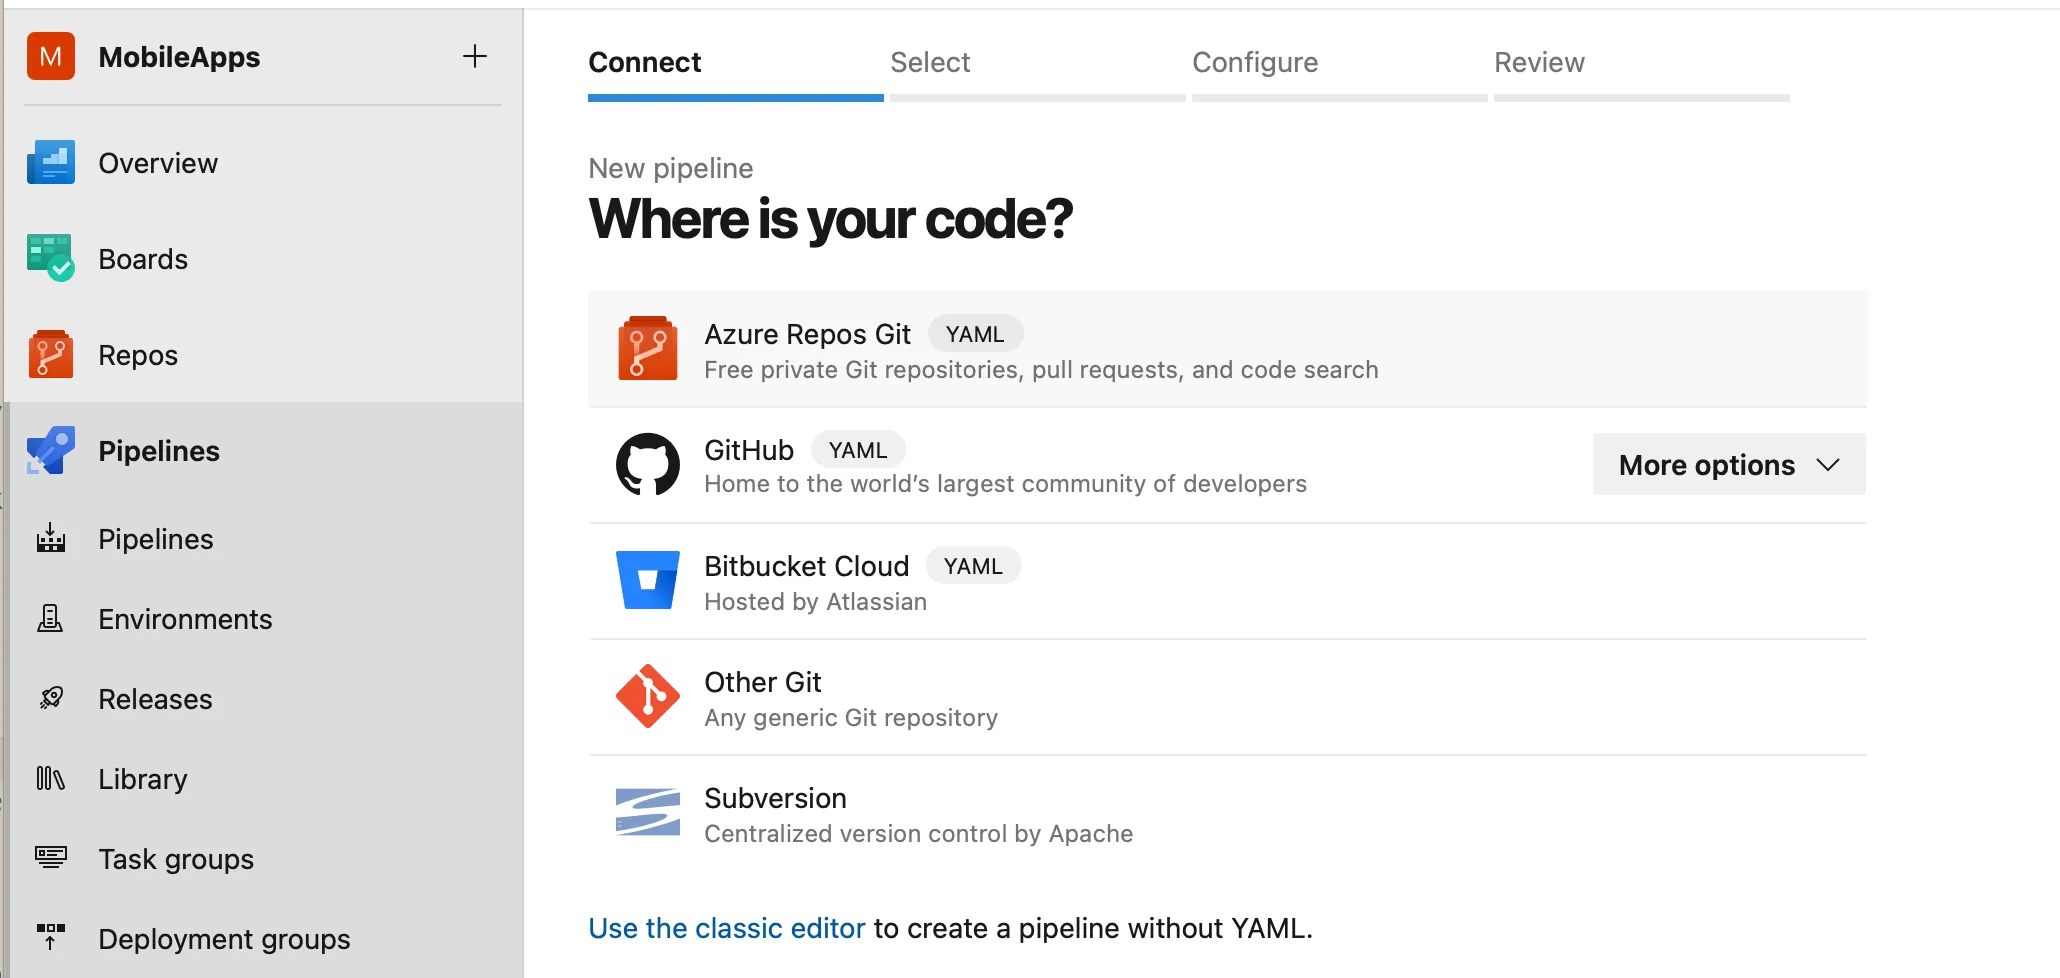
On the next screen you will ve prompted to choose where your source code resides. This tutorial covers however only case for code hosted in Azure Repos so lets select this option. It is still possible to connect our pipeline with external sources like GitHub or BitBucket or any arbitrary Git repository as well as Subversion. You may be missing some features and conveniences though...
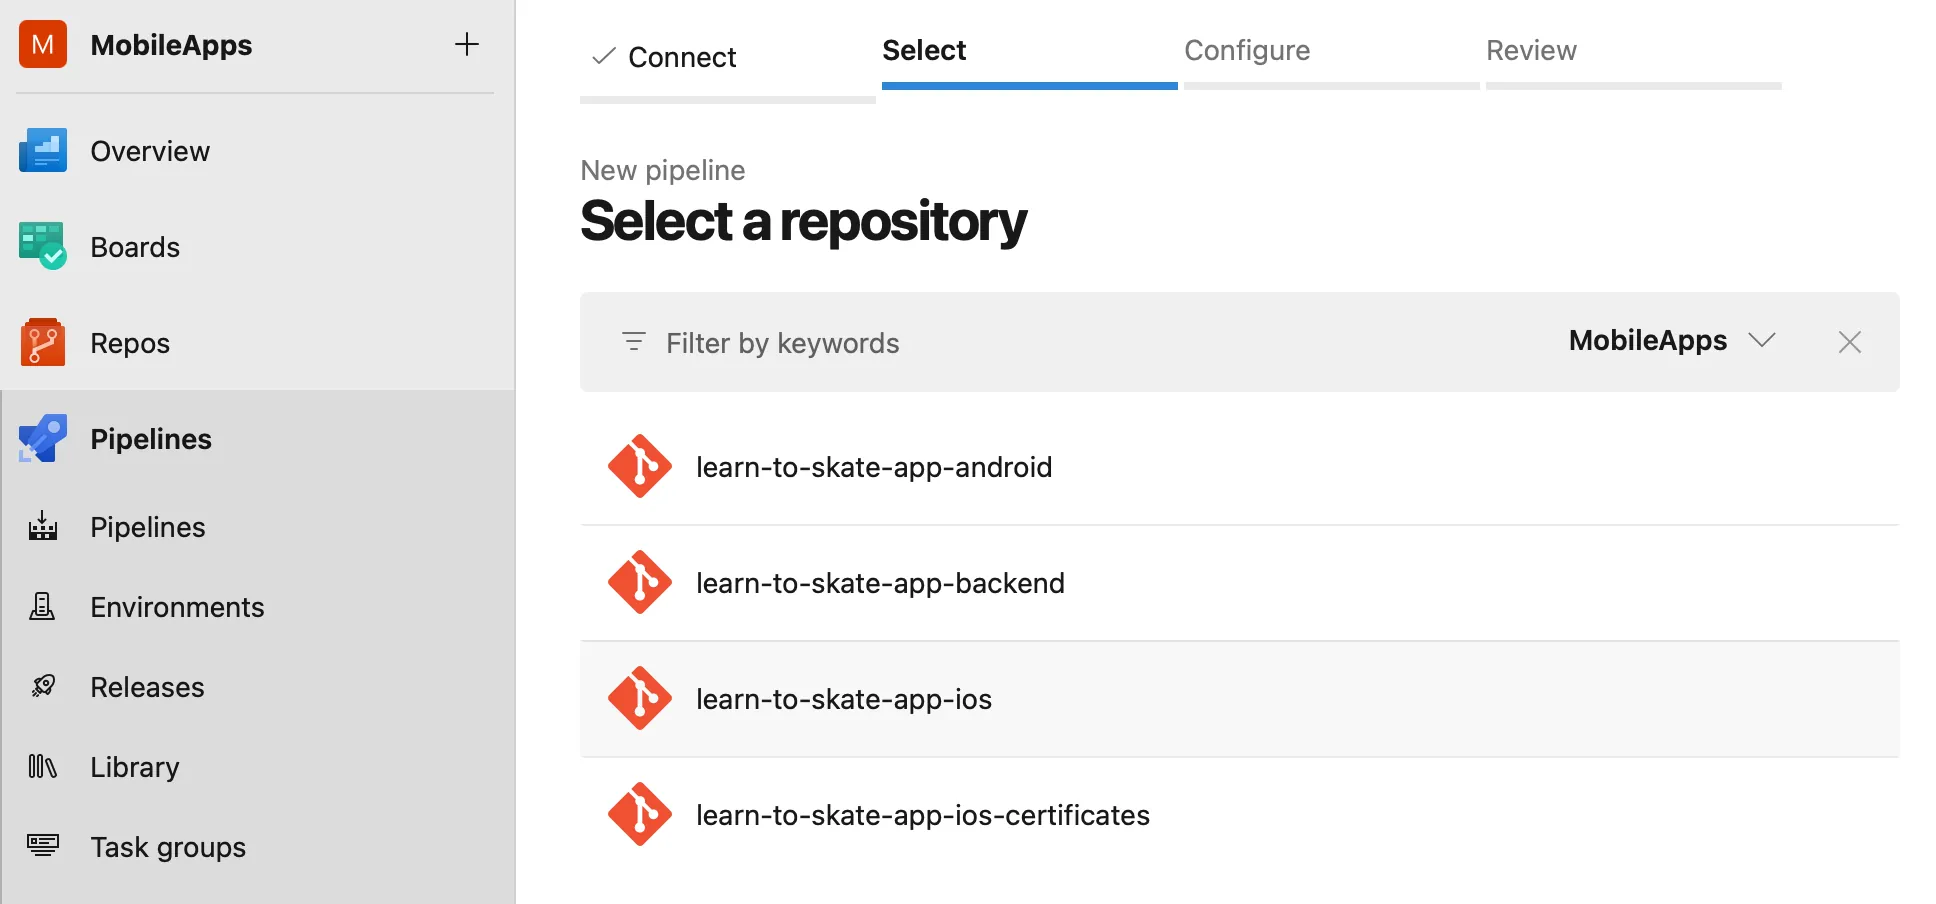
Now you have to select repository for which pipeline is being created. In my case this is repo for our iOS application.
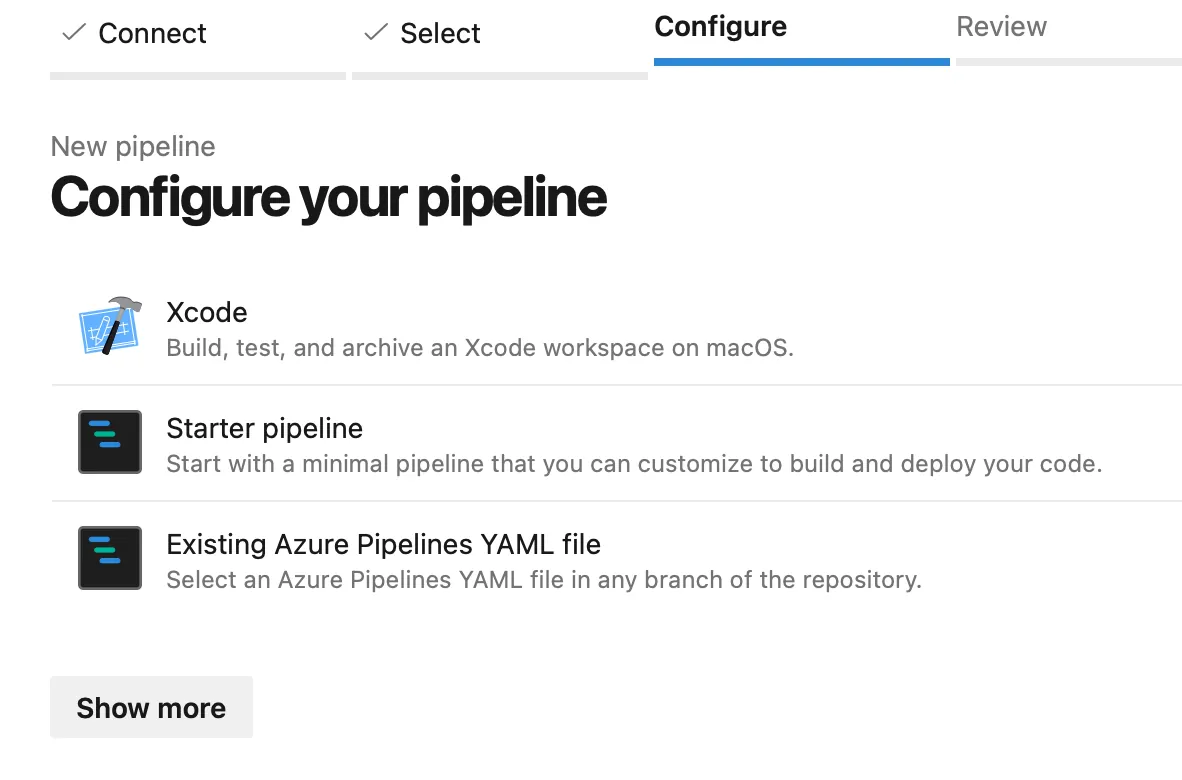
I hope in previous step you have selected repository with iOS source code. If you did just that then you will be presented with customized options including template based on Xcode v5 task. Personally I do not like such deep vendor lock-in but you can select it to see how it looks. We will modify this file later on nevertheless 😃
Now important part! Before you save your pipeline please checkout its path and name. Not only is it vague with generic name azure-pipelines.yml but also resides in project root...
We are good developers, we like order and verbosity! Lets rename that fella and put it somewhere nice and cozy. You may already be familiar with dot directories convention like .github, .vscode or .ssh. Taking that as an example I have put all my pipelines and related "code" inside .azure folder which nicely separates vendor specific files in a single hidden directory. To achieve the same just click name of the pipeline and edit its name and path - folders will be created for us during save.
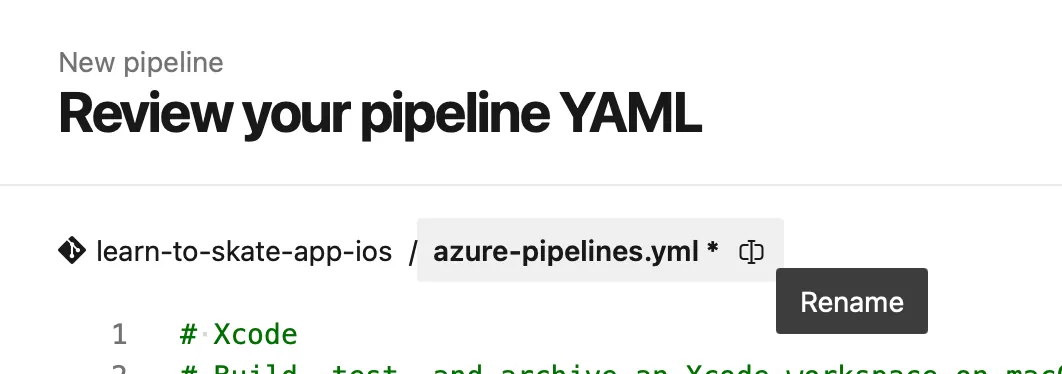

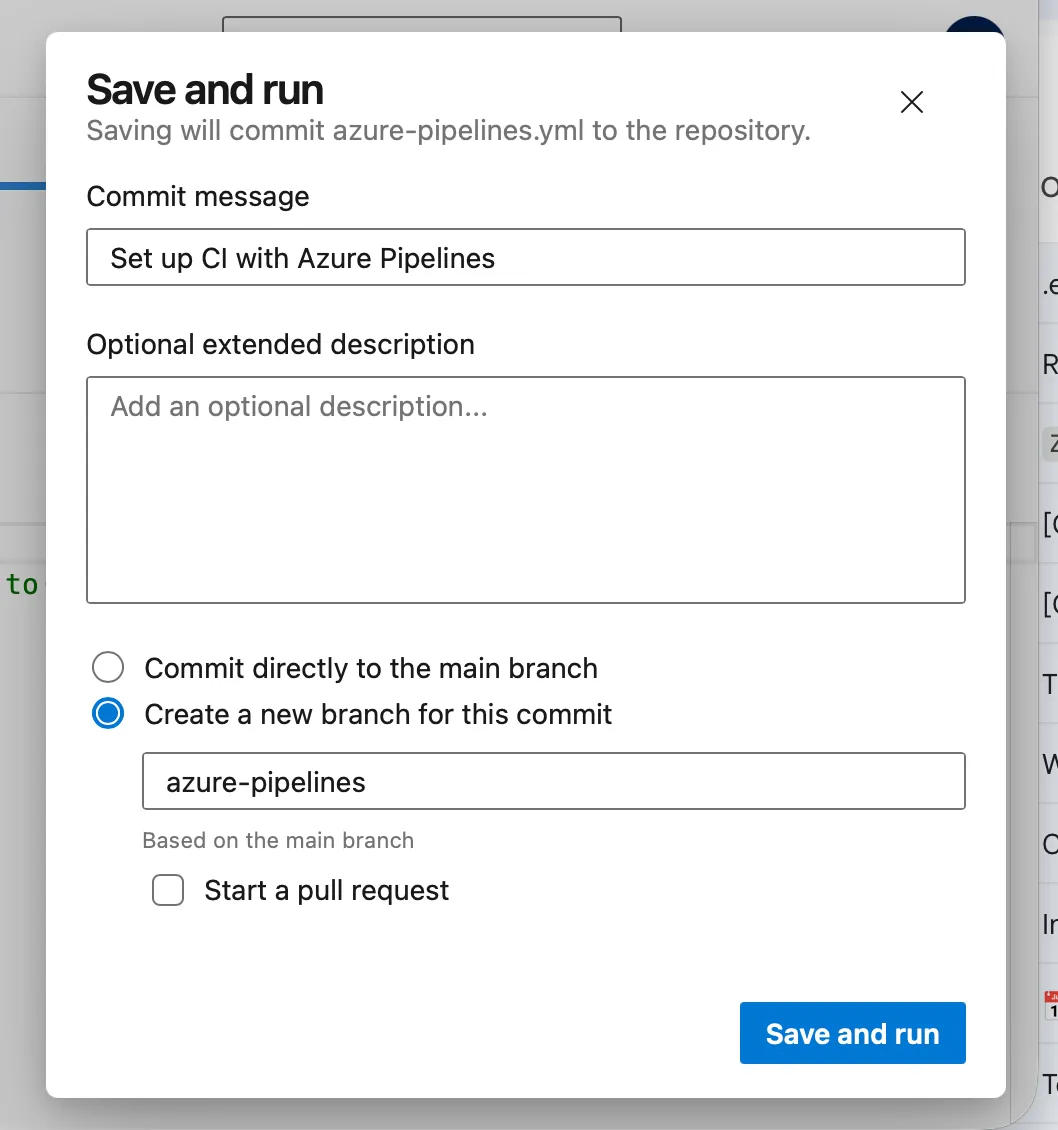
Yes, now we finally save (you can either select Save and run or just save using option from dropdown). We are not done however!

At this stage I will recommend you to create separate branch where you can work on actual pipeline implementation in your editor of choice.
Dial it in
Depending on your initial selection you will have pipeline which is probably not fully functional yet. We need to work on actual YAML to make it work. Lets break down building blocks of such pipeline.
Pipeline triggers
In the example pipeline you can spot trigger keyword as the first element of the pipeline yaml definition.
trigger:
- main
Such trigger will run our pipeline for push events happening on main branch. We can also specify triggering paths in the project, whether to batch runs and what tags should trigger a run. See trigger definition for more details on that.
What is missing here however is pull request trigger.
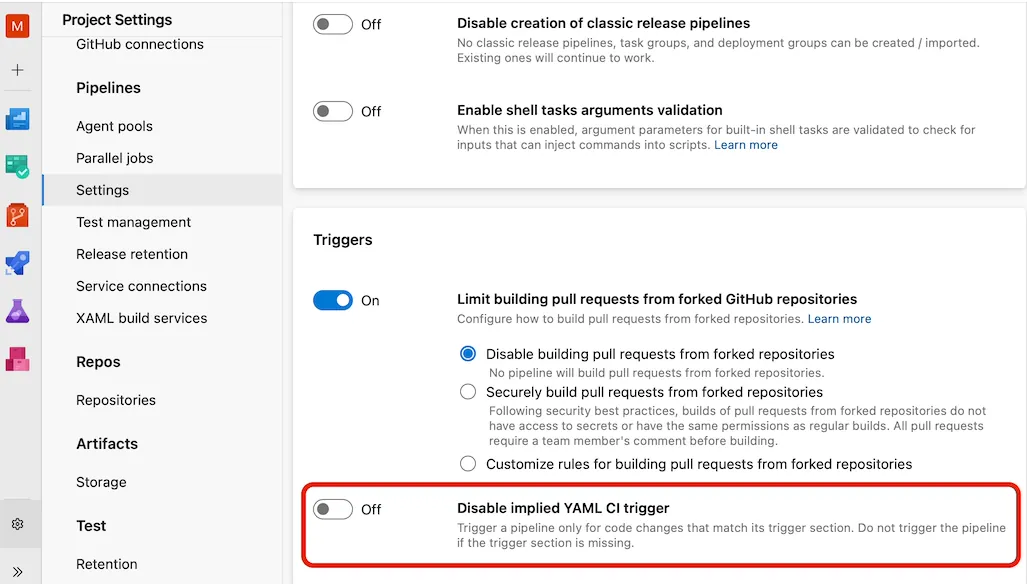
If you only want to trigger CI as part of pull request quality gate check and don't want it to run otherwise - you need to explicitly disable it. You can do that either with none option in each pipeline:
trigger: none
Alternatively you can Disable implied YAML CI trigger in your project settings (Azure DevOps -> Project Settings -> Pipelines -> Settings) or at organization level.
Runner environment
Second item in template pipeline is agent pool which states where our pipeline will be run. If we choose to use Microsoft hosted agents we can choose from windows, ubuntu and macOS virtual machines. Since we are creating CI for iOS project there is no much choice: we need mac OS in order to build project with xcode(build). You can either specify specific OS version like macOS-15 or macOS-14 or go with default choice using macOS-latest. Keep in mind however that macOS-latest won't actually be latest version of mac OS operating system available on the market.
Since we want to use microsoft hosted agents we will use vmImage option specifying VM version to run our pipeline.
pool:
  vmImage: "macOS-latest"
You can check pool definition to learn about more details.
Can we do something finally?
Now is the main sauce of the pipeline: steps. Steps allow us to specify sequential operations that will be made on a single runner. Azure DevOps allows us to organize our pipelines into stages where each stage can contain multiple jobs and each job is build out of steps. Stages and jobs execute concurrently on separate runners whereas steps runs sequentially on a single runner. In this tutorial we won't be considering those higher levels of pipeline hierarchy and will focus solely on steps. You may read about those in future article 😉
There are multiple types of steps that we can perform. From perspective of iOS CI creation most important are: checkout, task and script. Other interesting type that may be useful but not described in this tutorial is template. You can read more about other available step types in steps definition.
So first things first - we need to fetch our source code - as you can imagine we do so with checkout step:
steps:
- checkout: self
  fetchDepth: 1
  lfs: true
If not provided checkout will be performed implicitly with self parameter for all jobs besides deployment one. When we define pipeline with just steps we implicitly have single job and this job will implicitly run checkout for us if not defined.
When we have access to the source code we can finally do something fun, here is where task and script comes into play.
At this stage you might be interested in Cache@2 task that automatically saves and restores cache based on provided keys and paths. I have one for bundler:
parameters:
  - name: BUNDLER_PATH
    type: string
    default: vendor/bundle

steps:
  - task: Cache@2
    displayName: Cache Bundler gems
    inputs:
      key: 'bundler | "$(Agent.OS)" | "$(ImageVersion)" | Gemfile.lock'
      restoreKeys: |
        bundler | "$(Agent.OS)" | "$(ImageVersion)"
        bundler | "$(Agent.OS)"
      path: ${{ parameters.BUNDLER_PATH }}
In the snippet above I specify to cache files found in vendor.bundle folder which is same path I provide to bundler during install command. Later you can find key which consist of multiple elements: prefix (bundler) to distinguish it from other caches, OS version and runner image version explicitly specified as string and Gemfile.lock. Last part is the most important one. Specifying it like above is actually parsed as file path and that file is being hashed. If file changes then hash changes as well - that way we can tell if there is exact match for cached bundle or not. In case there is no exact match for cache found we use restoreKeys to find "nearest" cache best matching our current run. This is why we can provide multiple restoreKeys.
If you are like me and like to hold control, then scripts will take us from here. With scripts you can do basically anything that can be done in commandline (keeping in mind lack of interactivity - you cannot type password on CI runner).
We can for example add missing part to the Cache task above which is actually install bundle:
[...]
steps:
  [...]
  - script: "bundle install --path ${{ parameters.BUNDLER_PATH }}"
    displayName: Install Bundler dependencies
If you use fastlane, you could run unit tests using scan command, it will be as simple as defining it as steps.script like one below:
[...]
steps:
  [...]
  - script: fastlane scan
    displayName: Run unit tests with fastlane scan
Trigger CI run for PRs
So we created pipeline from our building blocks - now how to run it on Pull Requests? And how to make it a mandatory check before merge is allowed? You guessed it - project settings 😅
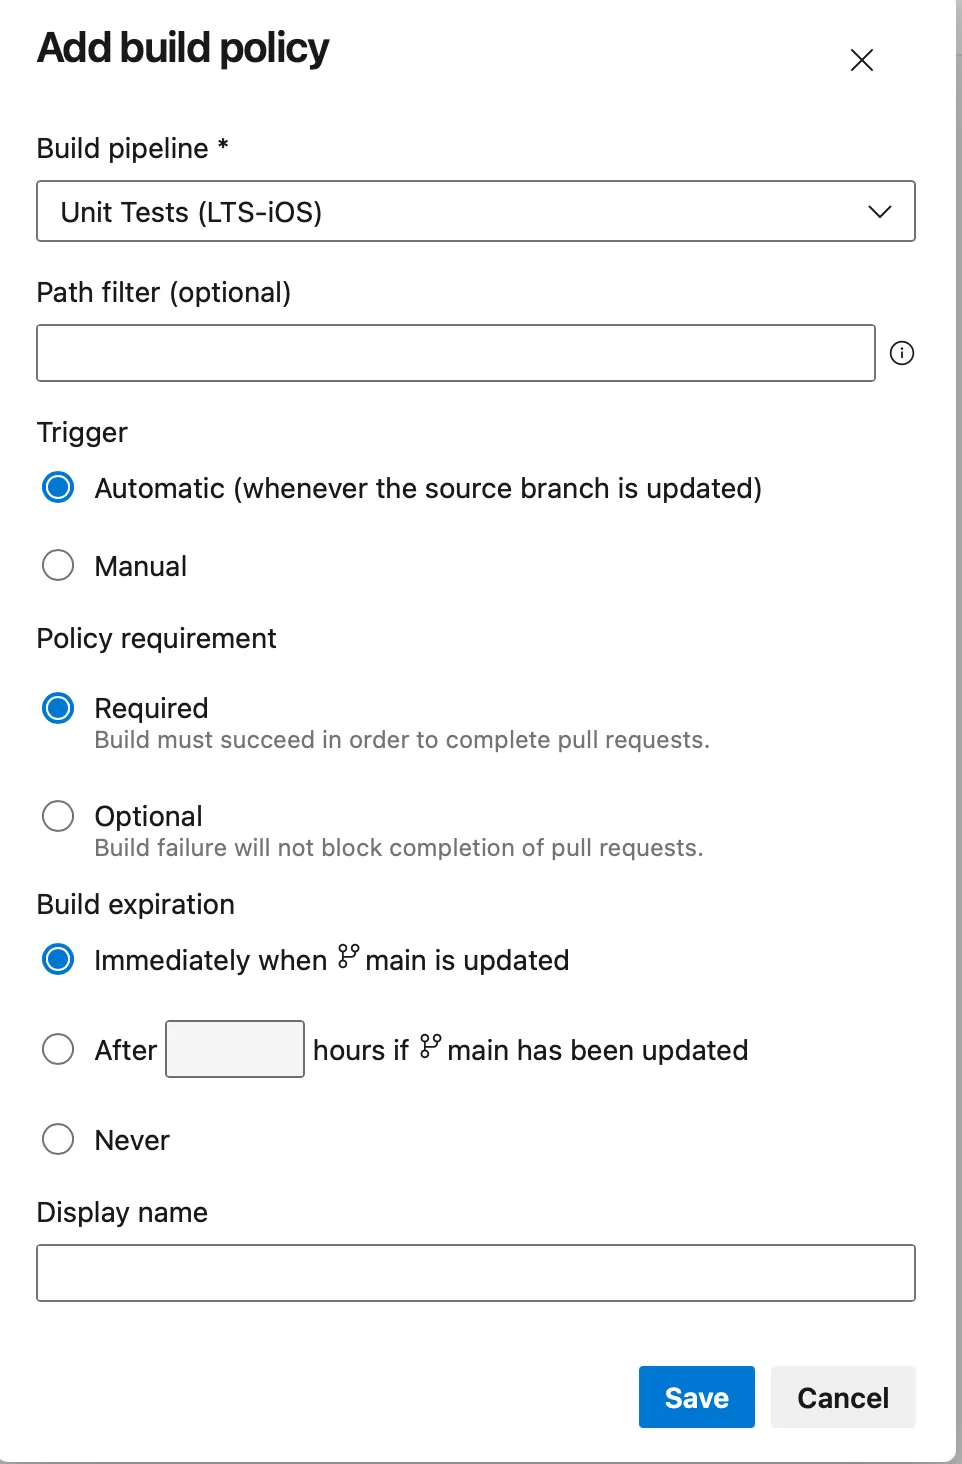
Navigate to Project Settings -> Repos -> Repositories -> your-repository -> Policies, then select target branch for which you would like to apply branch policy (CI check for pull request). Typically it will be your default branch (eg main or develop). After selecting branch you will see branch specific settings - scroll to bottom and add new Build Validation. Here you can select pipeline together with additional on how it should be enforced.
Example CI pipeline
Right now we have all we needed to create fully functional CI pipeline:
- Defined pipeline in Azure DevOps
- Created YAML definition for pipeline
- Learn basic keywords to create CI pipeline in YAML
Project I have worked on is using fastlane for automations (both CI and CD) which version is managed with bundler. Additionally it is using Cocoapods for dependency management (yeah, I know what year we have 🙈). Besides that I was still observing random slowdowns due to simulator bugs hence additional helper tools are being setup to combat that and speedup builds. Here is full pipeline:
trigger: none

pool:
  vmImage: "macOS-15"

parameters:
  - name: XCODE_VERSION
    type: string
    default: 26.1
  - name: BUNDLER_PATH
    type: string
    default: vendor/bundle
  - name: KILL_APSD
    type: boolean
    default: true
    displayName: Kill apsd process

steps:
  - script: sudo xcode-select -s /Applications/Xcode_${{ parameters.XCODE_VERSION }}.app
    displayName: Sets Xcode version to ${{ parameters.XCODE_VERSION }}

  - task: Cache@2
    displayName: Cache Bundler gems
    inputs:
      key: 'bundler | "$(Agent.OS)" | "$(ImageVersion)" | Gemfile.lock'
      restoreKeys: |
        bundler | "$(Agent.OS)" | "$(ImageVersion)"
        bundler | "$(Agent.OS)"
      path: ${{ parameters.BUNDLER_PATH }}

  - script: "bundle install --path ${{ parameters.BUNDLER_PATH }}"
    displayName: Install Bundler dependencies

  - task: Cache@2
    displayName: Cache Pods
    inputs:
      key: 'pods | "$(Agent.OS)" | "$(ImageVersion)" | "${{ parameters.XCODE_VERSION }}" | Podfile.lock'
      restoreKeys: |
        pods | "$(Agent.OS)" | "$(ImageVersion)" | "${{ parameters.XCODE_VERSION }}"
        pods | "$(Agent.OS)" | "$(ImageVersion)"
        pods | "$(Agent.OS)"
      path: "$(Build.SourcesDirectory)/Pods"

  - script: bundle exec pod install
    displayName: Install Cocoapods dependencies

  - script: |
        wget https://github.com/biscuitehh/yeetd/releases/download/1.0/yeetd-normal.pkg
        sudo installer -pkg yeetd-normal.pkg -target /
        defaults write dev.biscuit.yeetd killapsd ${{ parameters.KILL_APSD }}
        yeetd &
    displayName: Install and run Yeetd

  - script: bundle exec fastlane pr_check
    displayName: Build and run tests
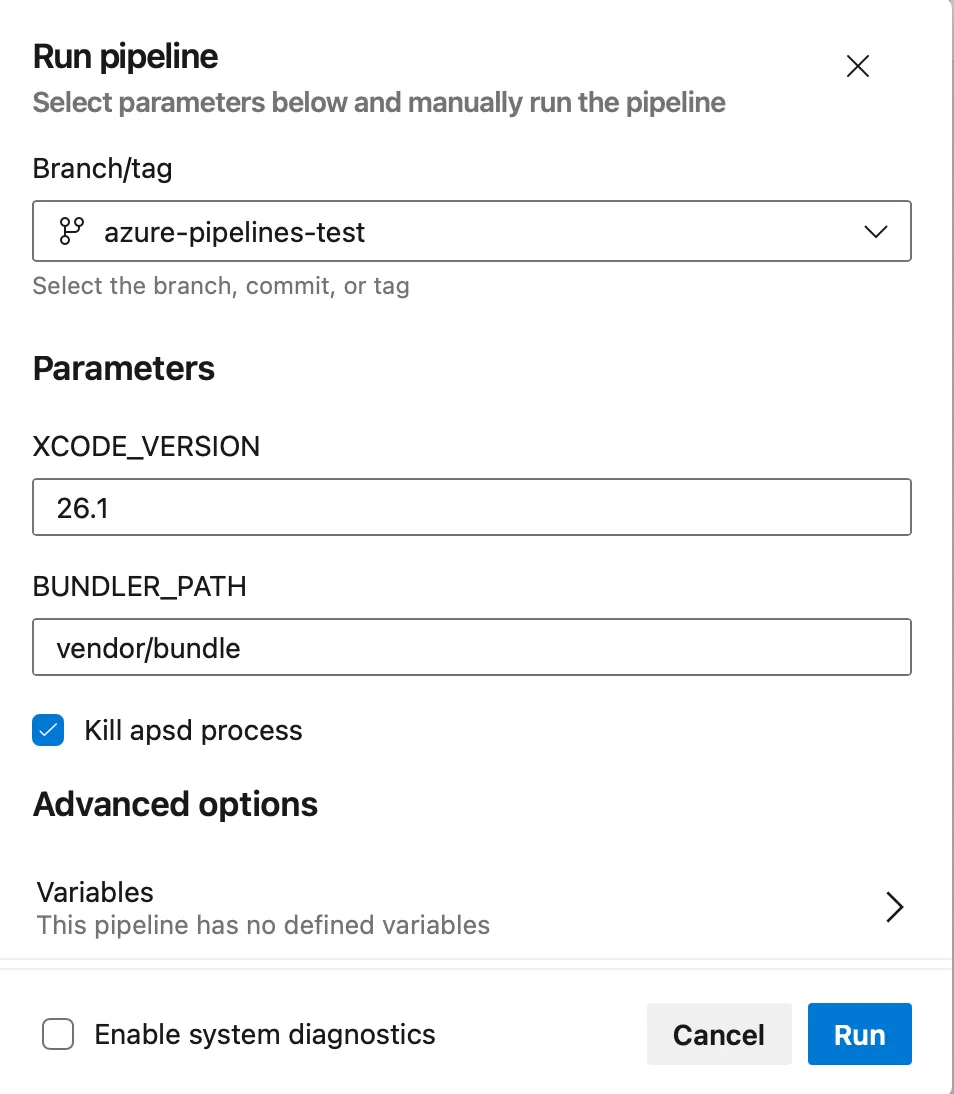
And here is how I call such pipeline from within Azure project -> Pipelines -> your-pipeline -> run

One more thing
I lied... Snippet above is not my real pipeline file. Instead I went crazy with previously mentioned template and here is how it actually looks:
trigger: none

pool:
  vmImage: "macOS-15"

variables:
  - template: variables/xcode-version.yml

steps:
  - template: templates/setup/project-steps.yml
  - template: templates/convenience/yeetd-step.yml
  - script: bundle exec fastlane pr_check
    displayName: Build and run tests
I will be sharing details on that as well as how to create CD pipeline in future article so stay tuned and experiment in the meantime.
Final thoughts
In the early days of my career I was having visceral thoughts about different infrastructure providers. Back in the day GitLab CI was my favorite and none other could come close. With time, experience and evolution of tools it faded away. I still had inner thoughts that Azure Devops may be rubbish yet I knew it is the best choice to stick with common approach in a bigger organization for which I prepared this setup.
This does not necessarily mean that one should always use tools that particular organization use - it is always context dependent. In a small stable team it will be much more important for the team members to be familiar with tools they use. If developer experience is at proper level then satisfaction of work will be respectively higher as well.
So yes - I liked it - it works just like any other CI/CD infrastructure. And it is deeply and neatly integrated in whole infrastructure we use for that project and it was incredibly simple to set up. Also I liked templating a lot, but more on that later...
