Android
3 min
Creating simple vector drawables in Android Studio
Using vector drawables is often much better than bitmap images for two reasons: they scale without losing definition and you need only one asset file which fits all screen densities.
Sometimes I find it useful to create vector drawables by hand in Android Studio using SVG paths.
If you are not yet familiar with it, let me show you an example.

Example
I'm going to create a rectangle consisting of two adjacent triangles varying in color like below:

Step 1: Create a drawable file
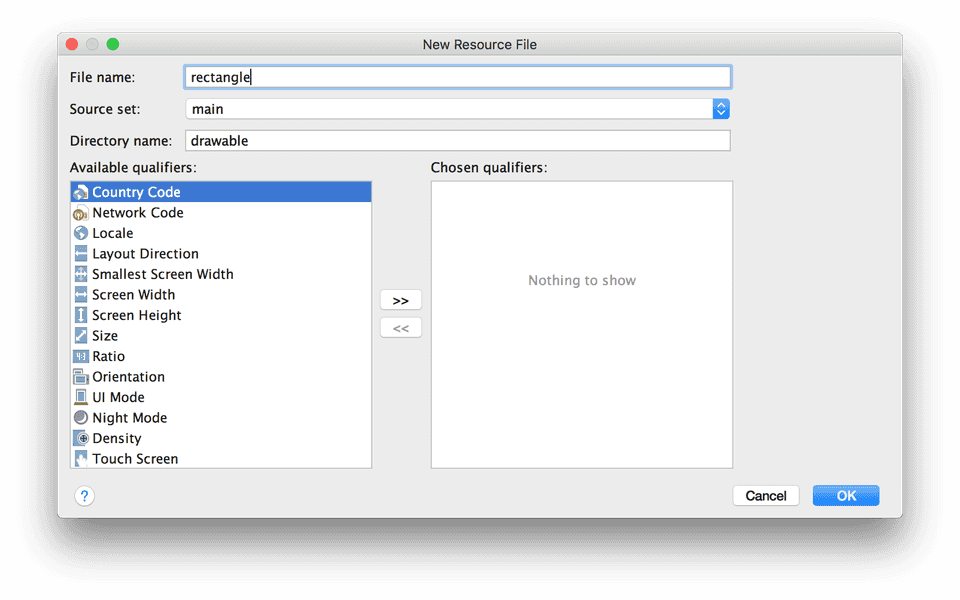
Step 2: Set up the drawable size
<?xml version="1.0" encoding="utf-8"?>
<vector xmlns:android="http://schemas.android.com/apk/res/android"
    android:height="100dp"
    android:width="100dp"
    android:viewportHeight="100"
    android:viewportWidth="100">

</vector>
The android:width and android:height properties define the drawable intrinsic size, so it matters mostly when you later use the drawable with wrap_content width and height like this:
<ImageView
        android:src="@drawable/rectangle"
        android:layout_width="wrap_content"
        android:layout_height="wrap_content" />
The android:viewportWidth and android:viewportHeight properties are more important for us as they define the canvas size for drawing our paths.
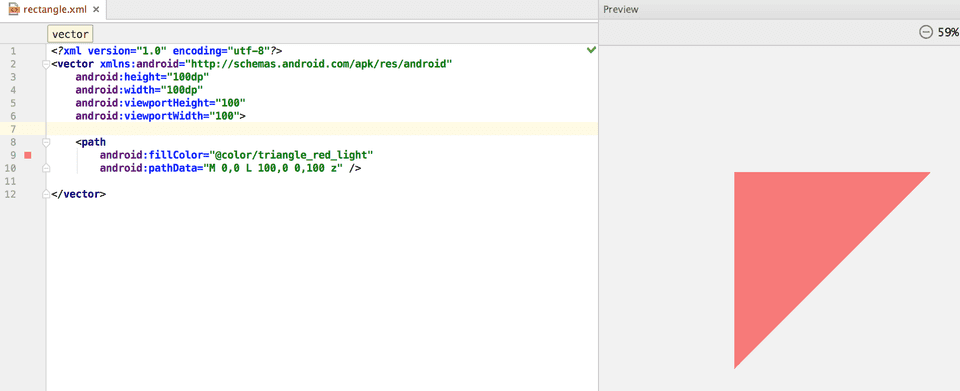
Step 3: Draw the first triangle
Let's fill a half of our squared canvas with the first triangle by drawing a path though its vertices: A, B and C.
Please note the coordinates — the top-left corner of the canvas is (0,0) and the bottom-right corner is (100,100) and that's because we set the android:viewportWidth="100" and android:viewportHeight="100".

You can draw a path by adding a path inside the vector:
<path
    android:fillColor="[your color (e.g. from resources or RGB Hex)]"
    android:pathData="[SVG path commands]" />
We need the following SVG commands here:
- M — absolute moveto
- L — absolute lineto
- z — closepath
Drawing the triangle consists of:
- starting a path from A=(0,0):
M 0,0 - drawing a line to B=(100,0):
L 100,0 - drawing a line to C=(0,100):
L 0,100 - closing the path:
z
We could also use the relative lineto (l) command instead and provide the vectors connecting the points like this:
- from A to B:
l 100,0 - from B to C:
l -100,100
It's also worth noting that if you use the same command multiple times in a row, the command letter can be eliminated on subsequent commands. So the final command looks like this: M 0,0 L 100,0 0,100 z
Let's put this in the drawable file:
<?xml version="1.0" encoding="utf-8"?>
<vector xmlns:android="http://schemas.android.com/apk/res/android"
    android:height="100dp"
    android:width="100dp"
    android:viewportHeight="100"
    android:viewportWidth="100">

    <path
        android:fillColor="@color/triangle_red_light"
        android:pathData="M 0,0 L 100,0 0,100 z" />

</vector>
We can see the triangle in the preview panel:
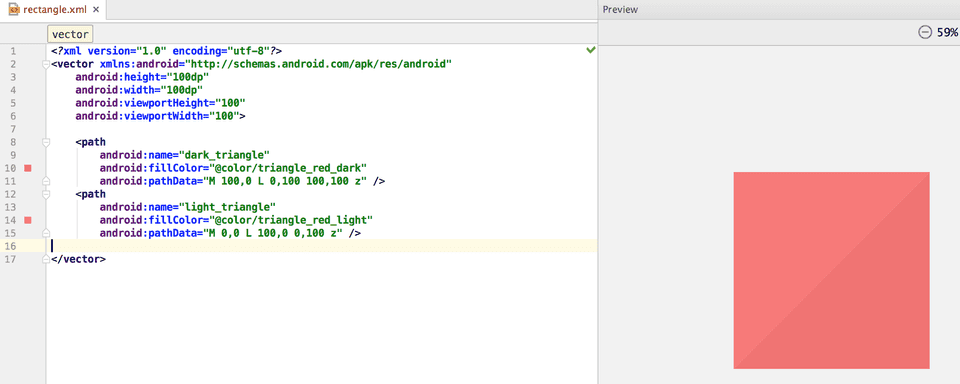
Step 4: Draw the second triangle
As we already know how to draw a path, it's very simple to create another triangle. Its vertices are:
- B=(100,0)
- C=(0,100)
- D=(100,100)
so the path command is: M 100,0 L 0,100 100,100 z
The resulting XML now looks like this:
<?xml version="1.0" encoding="utf-8"?>
<vector xmlns:android="http://schemas.android.com/apk/res/android"
    android:height="100dp"
    android:width="100dp"
    android:viewportHeight="100"
    android:viewportWidth="100">

    <path
        android:name="dark_triangle"
        android:fillColor="@color/triangle_red_dark"
        android:pathData="M 100,0 L 0,100 100,100 z" />

    <path
        android:name="light_triangle"
        android:fillColor="@color/triangle_red_light"
        android:pathData="M 0,0 L 100,0 0,100 z" />

</vector>
Hint: you can name the paths so it's easier to find them later if your drawable gets more complicated.
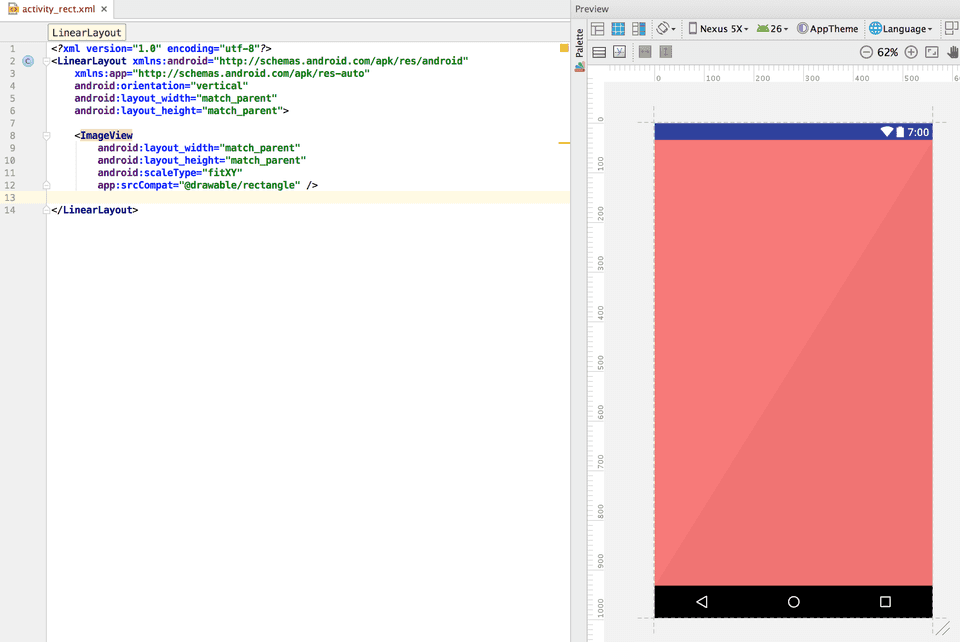
Step 5: Use the drawable with an ImageView
Now we can use the drawable. As you can see, it can be easily scaled by using the android:layout_width, android:layout_height and android:scaleType properties.
<?xml version="1.0" encoding="utf-8"?>
<LinearLayout xmlns:android="http://schemas.android.com/apk/res/android"
    xmlns:app="http://schemas.android.com/apk/res-auto"
    android:orientation="vertical"
    android:layout_width="match_parent"
    android:layout_height="match_parent">

    <ImageView
        android:layout_width="match_parent"
        android:layout_height="match_parent"
        android:scaleType="fitXY"
        app:srcCompat="@drawable/rectangle" />

</LinearLayout>