Develop your own cryptocurrency with Substrate Part 2
This is the second part of a series where we are implementing an ERC20 token with a Substrate node and accessing it from a NestJS application. The first part is available here. In this part, we will have a glimpse of the implementation of the ERC20 token using Substrate Runtime. We will also access it from a NestJS app.
You can access the working project on GitHub
Before we start
Before we start, build the node, purge the chain, and run it in development mode.
cargo build --release
./target/release/node-template purge-chain --dev
./target/release/node-template --dev
We will be using the smart contract from the previous part. You will probably need to forget the old smart contract instance and the wasm file in the Polkadot JS Apps (it is no longer available on-chain thus still visible in the UI). Go to Developer -> Contracts page. In the Contracts tab use the bin button next to the contract instance to forget the contract.

In the Code tab use the bin button next to the code hash to forget the code.

Now you can upload the code again and deploy the smart contract. Don't forget to update the smart contract address in the NestJS app if needed.
ERC20 token in Runtime
We will go through the code of the substrate runtime pallet available in this posts repo. We will explore the storage items, dispatchable functions, events, and errors. In parts, the code is based on the Substrate Runtime cookbook basic token implementation. If you want to get a deeper understanding of developing your own runtime modules I recommend starting off with the Build a PoE Decentralized Application. Substrate Collectables Workshop is also a great tutorial. Even though it bases on an older version of the Substrate Node Template, it gives a good understanding of Rust and Substrate modules principals.
The code we are going to focus on is placed in an erc20 pallet in the lib.rs file. The pallet is called erc20 and this is how we can access it from Polkadot JS API.
Storage items
Storage items are our boxes for data. The storage items are placed inside the decl_storage macro (if you see an exclamation mark in Rust, you are most likely using a macro).
decl_storage! {
    trait Store for Module<T: Trait> as Erc20Module {
      pub BalanceOf get(fn balance_of): map hasher(blake2_128_concat) T::AccountId => u64;
		  pub TotalSupply get(fn total_supply): u64 = 0;
		  Init get(fn is_init): bool;
		  pub Allowance get(fn allowance): map hasher(blake2_128_concat) (T::AccountId, T::AccountId) => u64;
    }
}
Let's break down the BalanceOf item declaration.
pub- the public/private modifiers only define whether or not other modules can access the items. You can read any storage item from the chain regardless of the scope defined here.BalanceOf- the name of the item. It is also the name of a getter function, that will be exposed to the world (i.e. through the Polkadot JS API).get(fn balance_of)- this is a getter function you, as a developer, can use inside this module. You can now access the value in two ways: the default one<BalanceOf<T>>::get(accountId)and with the getter functionSelf::balance_of(accountId).map hasher(blake2_128_concat) T::AccountId => u64- a storage item can be a simple value or some more complex structure like for example a map. We can also assign some initial value as in theTotalSupplyitem definition:u64 = 0.
With the declared storage items we will be able to query the module for the total supply of the token (TotalSupply), a balance of any account (BalanceOf), and allowance of a pair of accounts (Allowance). The Init item will tell us if the token is already initialized.
You can already play with your pallet with Polkadot JS Apps. Go to the Developer -> Chain State page, Storage tab. Select erc20 pallet in the left dropdown. In the right dropdown, you can now see the getter functions. As we have not initialized the token yet, you will get false as a result of init() and zeros for the other functions.

Functions
All the dispatchable functions are placed inside the decl_module macro. Let's take a look at the shortcut of it.
decl_module! {
  pub struct Module<T: Trait> for enum Call where origin: T::Origin {
    pub fn init(origin, total_supply: u64) {}
    pub fn transfer(origin, to: T::AccountId, value: u64) {}
    pub fn approve(origin, spender: T::AccountId, value: u64) {}
    pub fn transfer_from(origin, owner: T::AccountId, to: T::AccountId, value: u64) {}
  }
}
As you can see, we have all the functions known from the smart contract implementation: transfer for transferring owned tokens, approve to allow someone to transfer our tokens, and transfer_from to transfer tokens on behalf.
There is also an additional init function, which we will cover in a moment.
Events
When we submit a transaction, it gets included in a block, which is then approved to be a part of the chain. Once it is approved in the chain, the status is finalized. A finalized transaction does not however mean that the business function was successful. To reflect the actual state of the business logic we can use events and errors. Events are declared in the decl_event macro. You can use the documentation comments to describe the event. We have three events for each of the features: initialization of the token, transferring tokens and approving.
decl_event! {
  pub enum Event<T> where AccountId = <T as system::Trait>::AccountId {
    /// Token was initialized by user
    Initialized(AccountId),
    /// Tokens successfully transferred between users
    Transfer(AccountId, AccountId, u64), // (from, to, value)
    /// Allowance successfully created
    Approval(AccountId, AccountId, u64), // (from, to, value)
  }
}
Errors
As we said earlier, a transaction should be finalized thus failed. As, by design, we are not allowed to panic in a runtime function, we use errors to reflect the failure in a gentle manner. Errors are defined in the decl_error macro. Again, you can use the documentation comments to describe the events.
decl_error! {
  pub enum Error for Module<T: Trait> {
    /// Attempted to initialize the token after it had already been initialized.
    AlreadyInitialized,
    /// Attempted to transfer more funds than were available
    InsufficientFunds,
    /// Attempted to transfer more funds than approved
    InsufficientApprovedFunds,
  }
}
Token initialization
Let's take a look at the init function.
pub fn init(origin, total_supply: u64) {
  let sender = ensure_signed(origin)?;
  ensure!(!Self::is_init(), <Error<T>>::AlreadyInitialized);

  TotalSupply::put(total_supply);
  <BalanceOf<T>>::insert(&sender, total_supply);

  Init::put(true);

  Self::deposit_event(RawEvent::Initialized(sender));
}
The purpose of this function is to create a token with some initial supply and give all the units to the user who has signed the transaction. This is to be done once only. The first thing to do is to obtain the sender. There is the origin parameter, which is always the first parameter of a dispatchable function of a pallet. Amongst other data related to the transaction, it contains the sender.
In the second line of the function, we check if the token was already initialized and emit an error if so.
If the token was not initialized yet, we put the total supply value in the corresponding storage value. Next, we set the balance of the sender to the total supply value. The last step is to set the Init storage value to true so that we know the token has already been initialized.
In the very last line of the init function, we emit an Initialized event with the sender account.
Let's now initialize our token. We will use Polkadot JS Apps to call the function. Go to Developer -> Extrinsics page. Choose an account to create a token with. Choose the erc20 and init(tital_supply) extrinsic to submit. Fill in the total_supply value.

Sign and submit the transaction. You can see some events showing up in the upper right corner. One of them is the Initialized event.

We can also view the details of the event in the Network -> Explorer page.
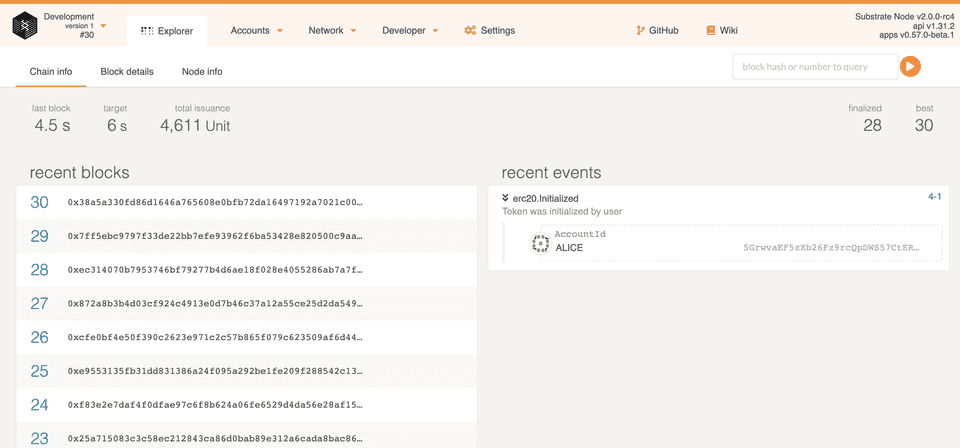
In the recent events block you can see the erc20.Initialized event. Just below the name, you can see the description from the comments. When you expand it, you can see the sender account. On the right side of the event, you can see the block number and the extrinsic number, here it is 4-1. You can click on it and explore the block.
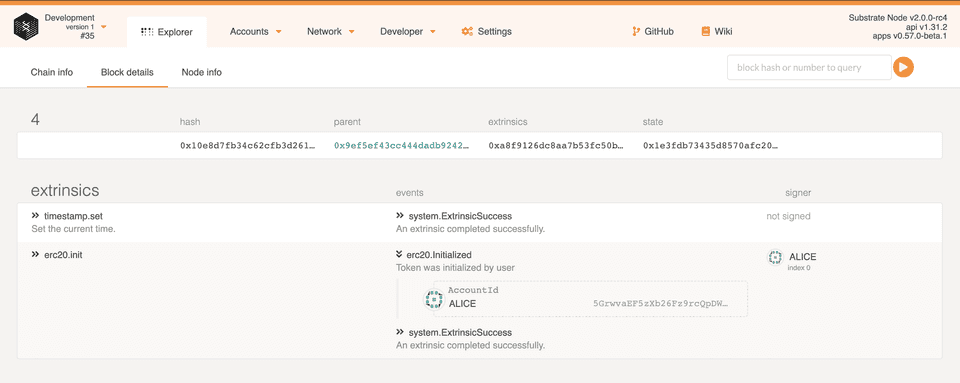
We can now try to initialize the token once again. As we were expecting, an AlreadyInitialized error showed up.
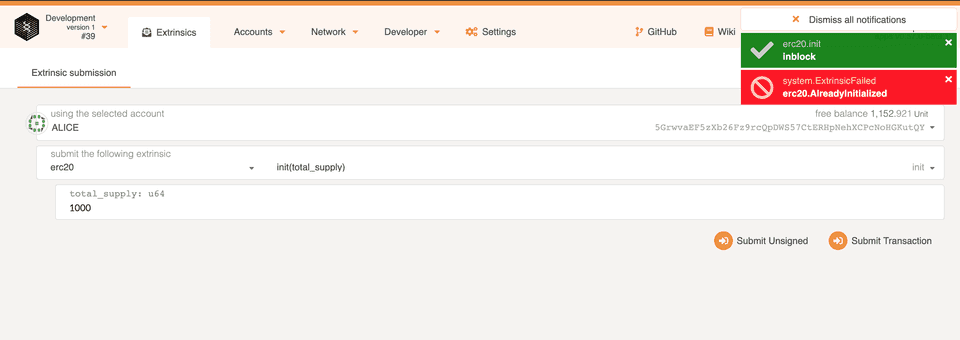
We can also view the details of the error in the Network -> Explorer page. It will not however show up in the recent events table, so you need to check the last few blocks manually to find the one with the error.
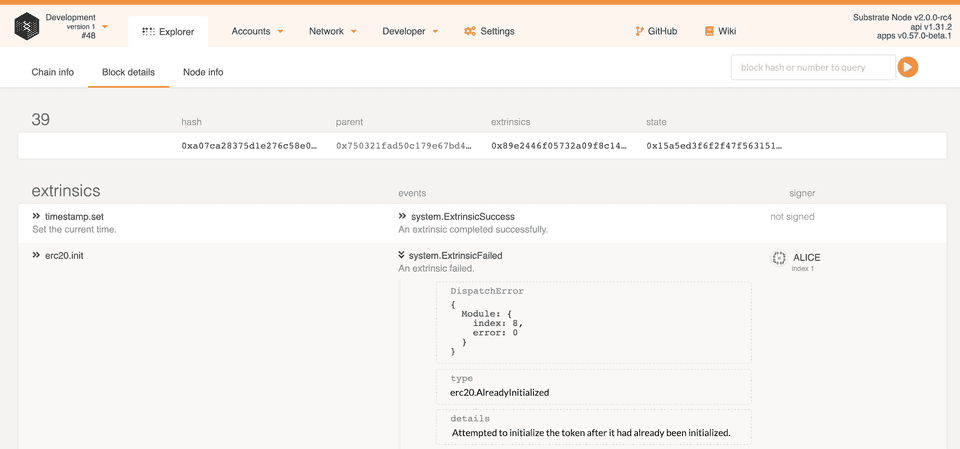
You can again see the type of the error as the AlreadyInitialized we have declared in the code. The details field is a description from the comment.
You can now check the values of init and totalSupply again in the Chain state page.
Polkadot JS API
Let's now switch to our backend app and try to call some runtime functions. We will start off from where we have finished the last part. We have a service for calling smart contract's functions and two controllers: for balances and approvals. We will create another service and switch between the two services in the controllers.
First of all, we will create an interface for an ERC20 service which declares all the functions we need. We will also add a sender to each function, which creates a blockchain transaction (transfer, approve, and transferFrom). This will let us choose an account to send and sign a transaction with.
// src/erc20.interface.ts

export interface Erc20 {
  totalSupply();
  balanceOf(who: string);
  transfer(sender: string, to: string, value: number);
  allowance(owner: string, spender: string);
  approve(sender: string, spender: string, value: number);
  transferFrom(sender: string, from: string, to: string, value: number);
}
Create a PolkadotApiService which will provide a connection to the Polkadot API. Move the logic from onModuleInit function from ContractService to the onModuleInit function of the new service. We will also add a keyring pair for each of the predefined accounts to be able to sign the transactions with it.
// src/polkadot-api.service.ts

import { Injectable, Logger, OnModuleInit } from '@nestjs/common';
import { ApiPromise, Keyring, WsProvider } from '@polkadot/api';
import { Abi, PromiseContract } from '@polkadot/api-contract';
import { KeyringPair } from '@polkadot/keyring/types';
import metadata from "./metadata.json";

const SUBSTRATE_URL = 'ws://127.0.0.1:9944'
export const ERC20 = '5DhP1rd5AEZCeZY77Zttbt293rX6tX4QnqEajEMd5i1QKsnB'

// accounts list to easily intercact with the API
export const ACCOUNTS = {
  ALICE: {
    address: '5GrwvaEF5zXb26Fz9rcQpDWS57CtERHpNehXCPcNoHGKutQY',
    pair: undefined,
  },
  BOB:  {
    address: '5FHneW46xGXgs5mUiveU4sbTyGBzmstUspZC92UhjJM694ty',
    pair: undefined,
  },
  CHARLIE:  {
    address: '5FLSigC9HGRKVhB9FiEo4Y3koPsNmBmLJbpXg2mp1hXcS59Y',
    pair: undefined,
  },
  DAVE:  {
    address: '5DAAnrj7VHTznn2AWBemMuyBwZWs6FNFjdyVXUeYum3PTXFy',
    pair: undefined,
  },
  EVE:  {
    address: '5HGjWAeFDfFCWPsjFQdVV2Msvz2XtMktvgocEZcCj68kUMaw',
    pair: undefined,
  },
}

@Injectable()
export class PolkadotApiService implements OnModuleInit {
  api: ApiPromise;
  abi: Abi;
  apiContract: PromiseContract;

  async onModuleInit() {
    Logger.log('Connecting to substrate chain...');
    const wsProvider = new WsProvider(SUBSTRATE_URL);
    this.api = await ApiPromise.create({
      provider: wsProvider,
      types: {
        "Address": "AccountId",
        "LookupSource": "AccountId"
      }
    });

    const abiJSONobj = (<any>metadata);
    this.abi = new Abi(this.api.registry, abiJSONobj);
    this.apiContract = new PromiseContract(this.api, this.abi, ERC20);

    await this.api.isReady;

    const keyring = new Keyring({ type: 'sr25519' });
    ACCOUNTS.ALICE.pair =  keyring.addFromUri('//Alice', { name: 'Alice default' });
    ACCOUNTS.BOB.pair =  keyring.addFromUri('//Bob', { name: 'Bob default' });
    ACCOUNTS.CHARLIE.pair =  keyring.addFromUri('//Charlie', { name: 'Charlie default' });
    ACCOUNTS.DAVE.pair =  keyring.addFromUri('//Dave', { name: 'Dave default' });
    ACCOUNTS.EVE.pair =  keyring.addFromUri('//Eve', { name: 'Eve default' });
  }
}
Register the new service in the app module.
// src/app.module.ts

@Module({
  imports: [],
  controllers: [AppController, BalancesController, AllowancesController],
  providers: [AppService, PolkadotApiService, ContractService],
})
export class AppModule { }
Change the ContractService to implement the Erc20 interface. Remove the OnModuleInit interface and the corresponding function. Inject the PolkadotApiService and use its api, apiContract, abi variables instead of the local ones. Change the transaction sender from fixed alice to the one chosen by a user. In the contract calls, which do not create a transaction (like totalSupply) we still need to pass some account, just as we need to pass the gas limit. The account will not however be charged, so let's stick to Alice in those cases.
// src/contract.service.ts

import { Injectable, Logger } from '@nestjs/common';
import { SubmittableResult } from '@polkadot/api';
import { ContractCallOutcome } from '@polkadot/api-contract/types';
import { Erc20 } from './erc20.interface';
import { ACCOUNTS, ERC20, PolkadotApiService } from './polkadot-api.service';

@Injectable()
export class ContractService implements Erc20 {
  constructor(private readonly polkadotApiService: PolkadotApiService) { }

  async totalSupply() {
    const result: ContractCallOutcome = await this.polkadotApiService.apiContract.call('rpc', 'totalSupply', 0, 1000000000000)
      .send(ACCOUNTS.ALICE.address) as ContractCallOutcome
    return result.output.toString()
  }

  async balanceOf(who: string) {
    const result: ContractCallOutcome = await this.polkadotApiService.apiContract.call('rpc', 'balanceOf', 0, 1000000000000, ACCOUNTS[who].address)
      .send(ACCOUNTS.ALICE.address) as ContractCallOutcome
    return result.output.toString()
  }

  async transfer(sender: string, to: string, value: number) {
    await this.polkadotApiService.api.tx.contracts.call(ERC20, 0, 1000000000000, this.polkadotApiService.abi.messages.transfer(ACCOUNTS[to].address, value))
      .signAndSend(ACCOUNTS[sender].pair, (result: SubmittableResult) => { Logger.log(result) })
  }

  async allowance(owner: string, spender: string) {
    const result: ContractCallOutcome = await this.polkadotApiService.apiContract.call('rpc', 'allowance', 0, 1000000000000, ACCOUNTS[owner].address, ACCOUNTS[spender].address)
      .send(ACCOUNTS.ALICE.address) as ContractCallOutcome
    return result.output.toString()
  }

  async approve(sender: string, spender: string, value: number) {
    await this.polkadotApiService.api.tx.contracts.call(ERC20, 0, 1000000000000, this.polkadotApiService.abi.messages.approve(ACCOUNTS[spender].address, value))
      .signAndSend(ACCOUNTS[sender].pair, (result: SubmittableResult) => { Logger.log(result) })
  }

  async transferFrom(sender: string, from: string, to: string, value: number) {
    await this.polkadotApiService.api.tx.contracts.call(ERC20, 0, 1000000000000, this.polkadotApiService.abi.messages.transferFrom(ACCOUNTS[from].address, ACCOUNTS[to].address, value))
      .signAndSend(ACCOUNTS[sender].pair, (result: SubmittableResult) => { Logger.log(result) })
  }
}
We can now add a new service to use the Substrate Runtime. Create RuntimeService which implements Erc20, inject PolkadotApiService and add empty functions to conform to the interface. Don't forget to register the service in the app module.
// src/runtime.service.ts

@Injectable()
export class RuntimeService implements Erc20 {
  constructor(private readonly polkadotApiService: PolkadotApiService) { }

  async totalSupply() {}
  async balanceOf(who: string) {}
  async transfer(sender: string, to: string, value: number) {}
  async allowance(owner: string, spender: string) {}
  async approve(sender: string, spender: string, value: number) {}
  async transferFrom(sender: string, from: string, to: string, value: number) {}
// src/app.module.ts

@Module({
  imports: [],
  controllers: [AppController, BalancesController, AllowancesController],
  providers: [AppService, PolkadotApiService, ContractService, RuntimeService],
})
To use the new service in the controllers, we will make some changes in them. To easily interact with the API and dynamically choose between the runtime and smart contract services add a :service param in the controller's path. Add a tokenService variable which we will assign the selected service to. Change the constructor to inject both services and the request and assign the tokenService with a proper service instance.
// src/balances.controller.ts

@Controller(':service/balances')
export class BalancesController {
  tokenService: Erc20;
  constructor(@Inject(REQUEST) private readonly request: Request, private readonly runtimeService: RuntimeService, private readonly contractService: ContractService) {
    this.tokenService = request.params.service === 'runtime' ? runtimeService : contractService;
  }
...
}
Query balances
Let's now implement the functions in our Runtime service. To implement the totalSupply() function, we will use the ApiPromise object from polkadotApiService. The api is structured as api.<type>.<module>.<section>.
-
type- this is the type of a call we want to make. There are a few types:const- for accessing runtime constants.rpc- this is the backbone for the transmission of data to and from the node. The following API endpoints just wrap RPC calls, providing information in the encoded format as expected by the node.query- for reading the current chain state.tx- for sending and submitting transactions.
-
module- this is the name of the module we want to access, i.e.erc20module we have just created. -
section- a function we want to call (always incamelCasealthough in Rust we declared the functions insnke_case).
To get the total supply of our token we will use api.query.erc20.totalSupply() function, await for the result, and return it.
async totalSupply() {
  const result = await this.polkadotApiService.api.query.erc20.totalSupply()
  return result
}
Retrieving the balance of an account is quite similar, we only need to pass the account as a parameter. We will use the ACCOUNTS array imported from the polkadot-api.service.ts, so that we can use the names instead of hashes when interacting with our api.
async balanceOf(who: string) {
  const result = await this.polkadotApiService.api.query.erc20.balanceOf(ACCOUNTS[who].address)
  return result
}
Run the backend app with yarn start:dev command and check the results in the browser. You should be able to successfully call http://localhost:3000/runtime/balances as well as http://localhost:3000/contract/balances and receive the corresponding values. You can also try to get Alice's or Bob's balances.
Transfer tokens
It is time to make a transaction and transfer some tokens. We will use api.tx.erc20.transfer() function. We need to pass three parameters: the transaction sender, the receiver, and the value. Once the transaction is created we need to sign and send it. To sign the transaction we will use the KeyringPair we have created earlier in the PolkadotApiService. We can also submit to the results to view them.
async transfer(sender: string, to: string, value: number) {
  await this.polkadotApiService.api.tx.erc20.transfer(ACCOUNTS[to].address, value)
    .signAndSend(ACCOUNTS[sender].pair, (result: SubmittableResult) => { Logger.log(result) })
}
Let's send a PUT request at http://localhost:3000/runtime/balances to transfer some tokens from Alice to Bob and review the logs.

We will see three results: an empty one upon transaction creation, one with InBlock status when the transaction was included in a block, and one with Finalized status when the transaction was finalized and cannot be forked off the chain. The transaction gets finalized even if business logic fails (i.e. you try to transfer more funds than you poses). When you look at the second logged message, you can find an event object which includes events and errors emitted by the runtime functions.
"event": {
  "index": "0x0401",
  "data": [
    "5GrwvaEF5zXb26Fz9rcQpDWS57CtERHpNehXCPcNoHGKutQY",
    "5FHneW46xGXgs5mUiveU4sbTyGBzmstUspZC92UhjJM694ty",
    1000
  ]
}
This is exactly the event we have emitted from the runtime transfer function. You can see the account addresses to transfer from 5GrwvaEF5zXb26Fz9rcQpDWS57CtERHpNehXCPcNoHGKutQY and to 5FHneW46xGXgs5mUiveU4sbTyGBzmstUspZC92UhjJM694ty and the value of 1000.
Let's now try to make a transfer for a larger amount than we possess. To make sure how much we can spend, check it here http://localhost:3000/runtime/balances/ALICE. We can again look at the event object:
"event": {
  "index": "0x0001",
  "data": [
    {
      "Module": {
        "index": 8,
        "error": 1
      }
    },
    {
      "weight": 10000,
      "class": "Normal",
      "paysFee": "Yes"
    }
  ]
},
In the data array we have information about the error. The Module object has two elements:
index- the index of a module defined in theRuntimeenum. You can find it in runtime'slib.rsfile inconstruct_runtimemacro:
// substrate-node-template/runtime/src/lib.rs

construct_runtime!(
	pub enum Runtime where
		Block = Block,
		NodeBlock = opaque::Block,
		UncheckedExtrinsic = UncheckedExtrinsic
	{
		System: system::{Module, Call, Config, Storage, Event<T>},
		RandomnessCollectiveFlip: randomness_collective_flip::{Module, Call, Storage},
		Timestamp: timestamp::{Module, Call, Storage, Inherent},
		Aura: aura::{Module, Config<T>, Inherent(Timestamp)},
		Grandpa: grandpa::{Module, Call, Storage, Config, Event},
		Balances: balances::{Module, Call, Storage, Config<T>, Event<T>},
		TransactionPayment: transaction_payment::{Module, Storage},
		Sudo: sudo::{Module, Call, Config<T>, Storage, Event<T>},
		// Used for the module erc20 in `./erc20.rs`
		Erc20: erc20::{Module, Call, Storage, Event<T>},
		Contracts: contracts::{Module, Call, Config, Storage, Event<T>},
	}
);
error- the index of the emitted error. The error enum is defined in thedecl_errormacro in our pallet'slib.rsfile
// substrate-node-template/pallets/erc20/src/lib.rs

decl_error! {
    pub enum Error for Module<T: Trait> {
        /// Attempted to initialize the token after it had already been initialized.
        AlreadyInitialized,
        /// Attempted to transfer more funds than were available
        InsufficientFunds,
		    /// Attempted to transfer more funds than approved
        InsufficientApprovedFunds,
    }
}
We can obtain the detailed names from a metadata object. It includes all the descriptive information about runtime modules, their storage, events, dispatchables and errors. To get the metadata of the runtime we query the runtime state object.
const metadata = await this.polkadotApiService.api.rpc.state.getMetadata() as Metadata;
The metadata contains information for each version of the runtime, but we want to get just the latest one, thus we use .asLatest.
result.events.forEach(({ event }) => {
      event.data.forEach(async el => {
        const module = el.toJSON()["Module"];
        if (module !== undefined && module.index !== undefined && module.error !== undefined) {
          Logger.log(metadata.asLatest.modules[module.index].name); // Erc20
          Logger.log(metadata.asLatest.modules[module.index].errors[module.error].name); // InsufficientFunds
          Logger.log(metadata.asLatest.modules[module.index].errors[module.error].documentation); // Attempted to transfer more funds than were available
        }
      })
    })
Approval
We now need to implement the approval feature. We need to add three functions to our runtime service - for retrieving allowances, for adding an approval and for transferring on behalf. It is quite straightforward, as we just need to dispatch the corresponding functions from our runtime and sign and send them with a selected account.
async allowance(owner: string, spender: string) {
    const result = await this.polkadotApiService.api.query.erc20.allowance([ACCOUNTS[owner].address, ACCOUNTS[spender].address])
    return result
  }

  async approve(sender: string, spender: string, value: number) {
    await this.polkadotApiService.api.tx.erc20.approve(ACCOUNTS[spender].address, value)
      .signAndSend(ACCOUNTS[sender].pair, (result: SubmittableResult) => { Logger.log(result) })
  }

  async transferFrom(sender: string, from: string, to: string, value: number) {
    await this.polkadotApiService.api.tx.erc20.transferFrom(ACCOUNTS[from].address, ACCOUNTS[to].address, value)
      .signAndSend(ACCOUNTS[sender].pair, (result: SubmittableResult) => { Logger.log(result) })
  }
We also need to change the AllowancesController to use the RuntimeService.
// src/allowances.controller.ts

@Controller(':token/allowances')
export class AllowancesController {
  tokenService: Erc20;
  constructor(@Inject(REQUEST) private readonly request: Request, private readonly runtimeService: RuntimeService, private readonly contractService: ContractService) {
    this.tokenService = request.params.token === 'runtime' ? runtimeService : contractService;
  }
...
We can now let Alice approve Charlie to make some transfers on behalf of her.

If everything goes as it should, Charlie can now send some tokens from Alice to Bob.
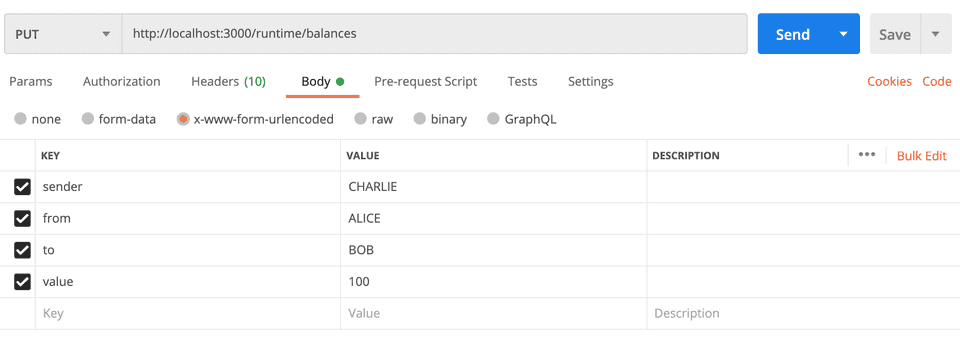
Unfortunately, such a transfer produces Internal server error. It should say something like 1010: Invalid Transaction: Inability to pay some fees (e.g. account balance too low). It could look like we have some bug and try to transfer tokens from Charlie's account, which is empty for now. However, the reason is a little different. By default, for transaction fees Substrate uses the token from Balances pallet. In Polkadot JS Apps you Accounts -> Accounts page you can see each account's balance represented in the Balances pallet's tokens. When you start a pure chain in development mode Alice and Bob are the only accounts minted with some tokens.
First of all, we need to fix our code to respond gently when an error occurs. The simplest way would be to add a try-catch block in the BalancesController function for transferring and throw an HttpException in the catch block.
// src/balances.controller.ts

@Put()
  @HttpCode(202)
  async transfer(@Body() transferDto: TransferDto) {
    try {
      if (transferDto.from !== undefined) {
        await this.tokenService.transferFrom(transferDto.sender, transferDto.from, transferDto.to, transferDto.value);
      }
      else {
        await this.tokenService.transfer(transferDto.sender, transferDto.to, transferDto.value);
      }
    }
    catch (err) {
      throw new HttpException(err.message, HttpStatus.BAD_REQUEST)
    }
  }
Let's try to send the request again and confirm that we get the 400 response instead of 500.

Now we can transfer some basic Substrate tokens from Alice do Charlie, to let him pay a transaction fee. Go to Polkadot JS Apps and choose Accounts -> Accounts page. Click send button in Alice's row and transfer 10 units from Alice do Charlie.
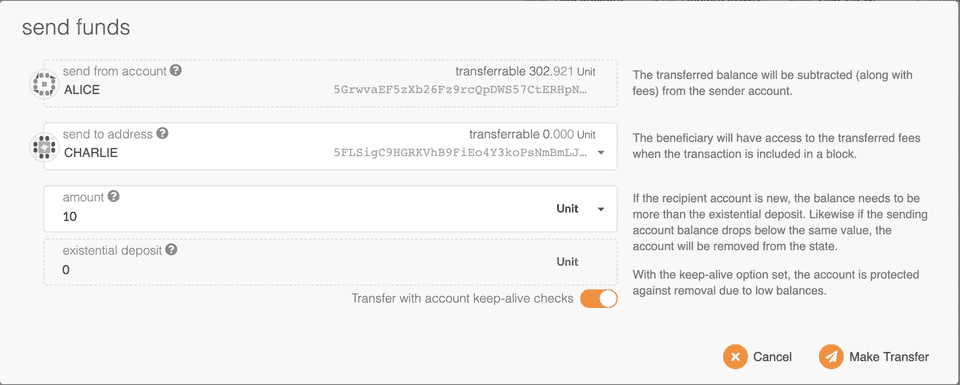
Charlie can finally send 100 tokens from Alice to Bob. We can check that the approval was reduced by 100 and now it is 100. Charlie can try to transfer another 150 tokens from Alice to Bob. We should receive an event with the InsufficientApprovedFunds error.
Summary
In this blog post, we have looked through the implementation of the ERC20 token in a Substrate Runtime module. We have also created a NestJS app that reads data exposed by the module, calls the dispatchable functions and shows the emitted events and errors.
