Upload iOS App to TestFlight with GitHub Actions and Fastlane Match – 2025 Tutorial with Example
In previous parts of a tutorial we were building app and running tests locally with fastlane and building app and running tests with usage of GitHub Actions. Now our goal is to upload an app to TestFlight with usage of GitHub Actions and Fastlane Match!

Before we move on, you need to have an
- Empty, private repository on GitHub where you will store your certificates and provisioning profiles generated by Fastlane Match.
- Fastlane configured on your device, I described how to do it here.
- Apple developer account.
Our goal is to improve the process of testing and distributing the app to customers.
Understanding Fastlane Match
Before diving into configuring Fastlane Match, let's first understand what it is and how it works.
It's a Fastlane tool that makes it easier for your team to manage and share iOS and macOS certificates and provisioning profiles. It keeps everything secure in a Git repository, where you can track changes. This way, everyone uses the same credentials, which helps prevent issues in the code signing.
Configuring Fastlane Match
In console enter command
fastlane match init
After that you will need to select where you want to store your profiles and certificates. The most common option is git which we will use in this tutorial

Next step is to paste the url where we want to store your profiles.

You can check that in the folder a new file named “Matchfile” was created. When you open it, you can see that it stores configuration details for code signing. Let’s go line by line.
git_url("git@github.com:LinkToYourRepo.git")
storage_mode("git")
type("development")
app_identifier(["your.app.identifier"])
- Git url which we selected in previous step.
- The storage mode you selected during the initial step of Fastlane Match setup.
- Here, we specify the type of provisioning profile and certificate that Fastlane should manage, which can be: appstore, adhoc or development.
- An app identifier is a unique string that identifies your app, typically formatted as a reverse-domain name (e.g., com.example.myapp).
Great, you have your matchfile configured! Our next goal is to run a fastlane match locally.
Running a Fastlane Match locally
In terminal enter command:
fastlane match
First, you need to set a passphrase for the Git repository. This is an additional layer of security: each of the files will be encrypted using openssl. Make sure to remember the password, as you'll need it when you run a match on a different machine.
To set the passphrase to decrypt your profiles using an environment variable (and avoid the prompt) use MATCH_PASSWORD.

As a next step you will need to enter your Apple Developer account username which will be used to create certificates and profiles.

If your user is associated with more than one team, then you will need to specify on which team you want to create certificates.
You'll need to enter your password here. If you have two-factor authentication (2FA) enabled, you can enter the 2FA code directly into the console.
You might need to enter your username a few more times if match won’t be able to find code signing identity.
As a confirmation that everything went fine, you should see a message:
All required keys, certificates and provisioning profiles are installed 🙌
Great! With development profiles and certificates, you'll be able to install your app on your physical device. Now, let's do the same for App Store certificates and profiles, which are necessary for uploading your app to TestFlight. After generating profiles and certificates, an Xcode restart might be needed to make them visible inside it.

For that go back to Matchfile and change type to appstore. It should look like this:
type("appstore")
Save file, go back to terminal and once again enter
fastlane match
and do a setup once again. This time we created AppStore certificates and profiles.
After finishing this step you can go to xcode and check that in the Signing and Capabilities tab no error is prompted.
Congratulations! You've created all the metadata required for signing your application.
GitHub secrets
GitHub Secrets are encrypted variables in a repository or organization, used to securely pass sensitive information to GitHub Actions workflows, ensuring data like API keys and tokens are not exposed in the codebase. Let’s add the necessary data for the build agent to upload your app to TestFlight.
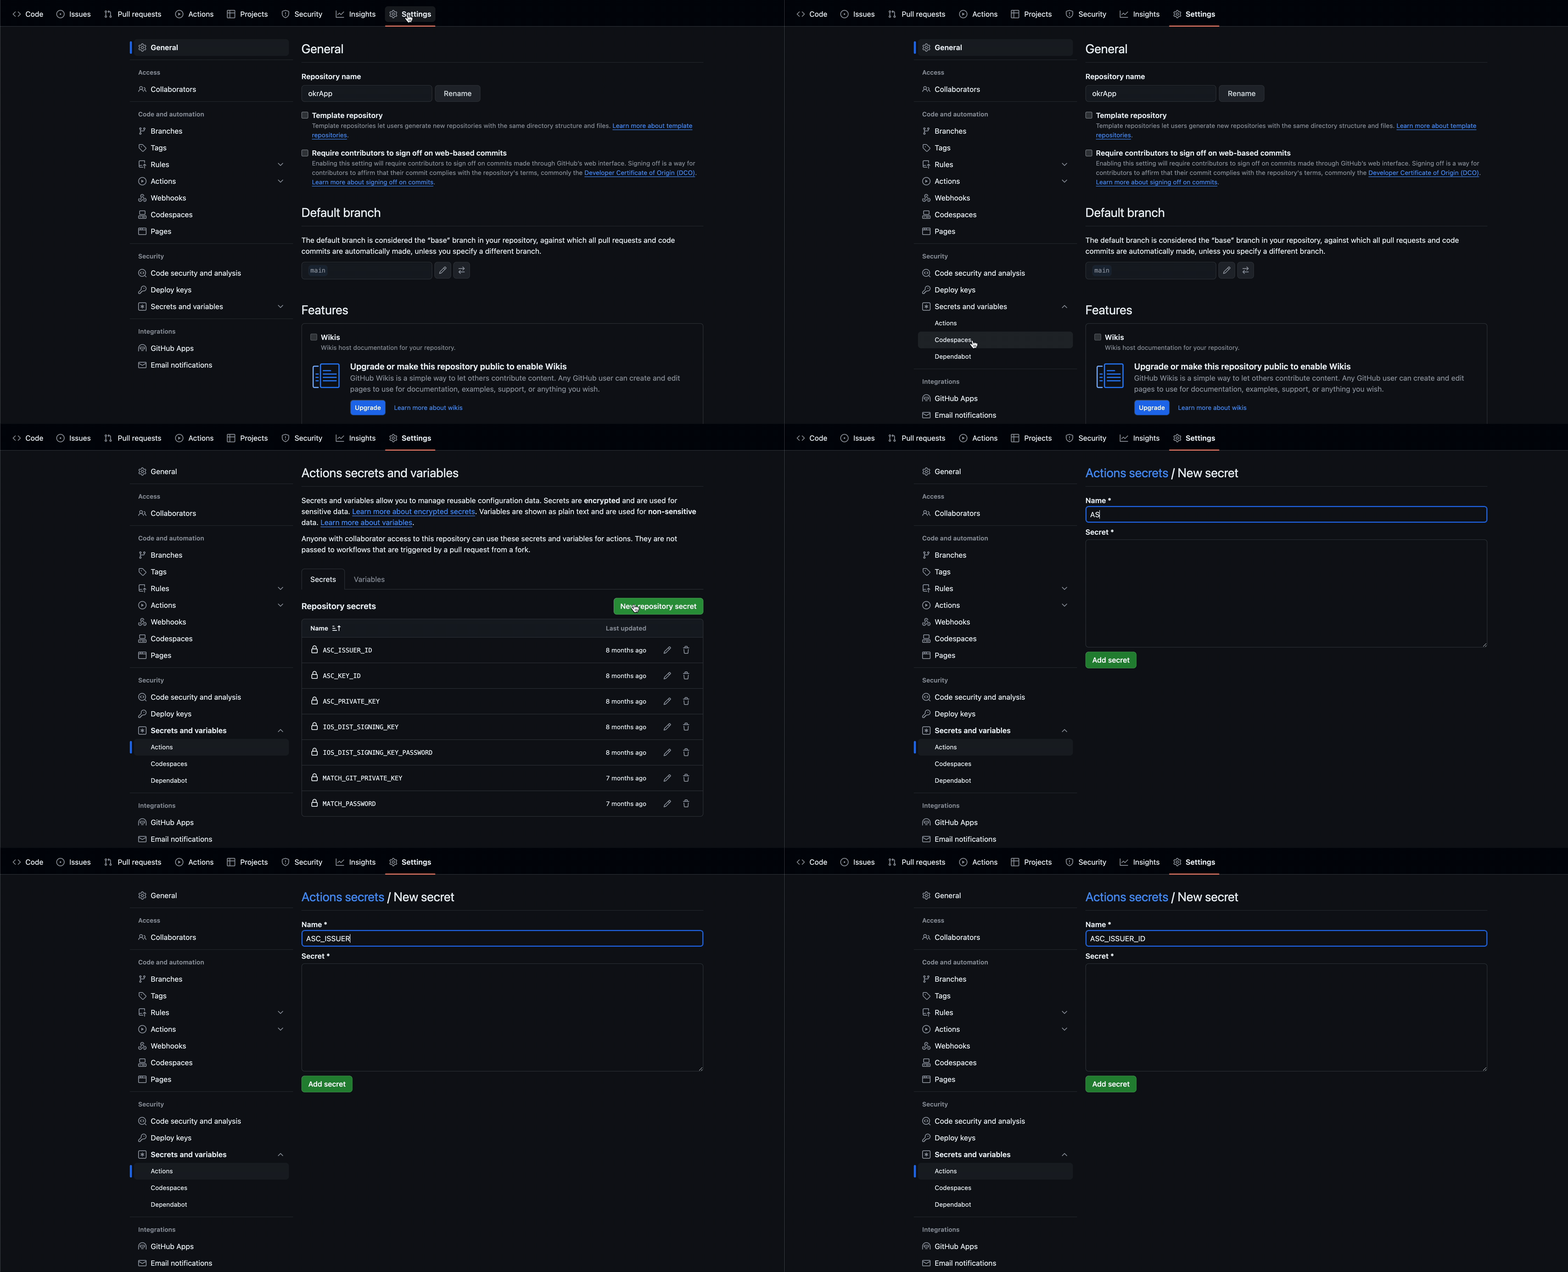
To upload data as GitHub secrets follow steps from GIF below (Settings -> Secrets and variables -> Actions).

To make your CI/CD work you need to upload 5 things as GitHub Secrets. In brackets I entered names which I recommend to use, as this is what we will use in our workflow file. If you don’t know how to get these - don’t worry, below I described how you can get all of this data.
- AppStoreConnect Issuer ID (ASC_ISSUER_ID)
- AppStoreConnect key ID (ASC_KEY_ID)
- AppStoreConnect key content (ASC_KEY_CONTEND
- Match password (MATCH_PASSWORD)
- Match git private key (MATCH_GIT_PRIVATE_KEY)
AppStoreConnect Issuer ID, Key ID & Key Content
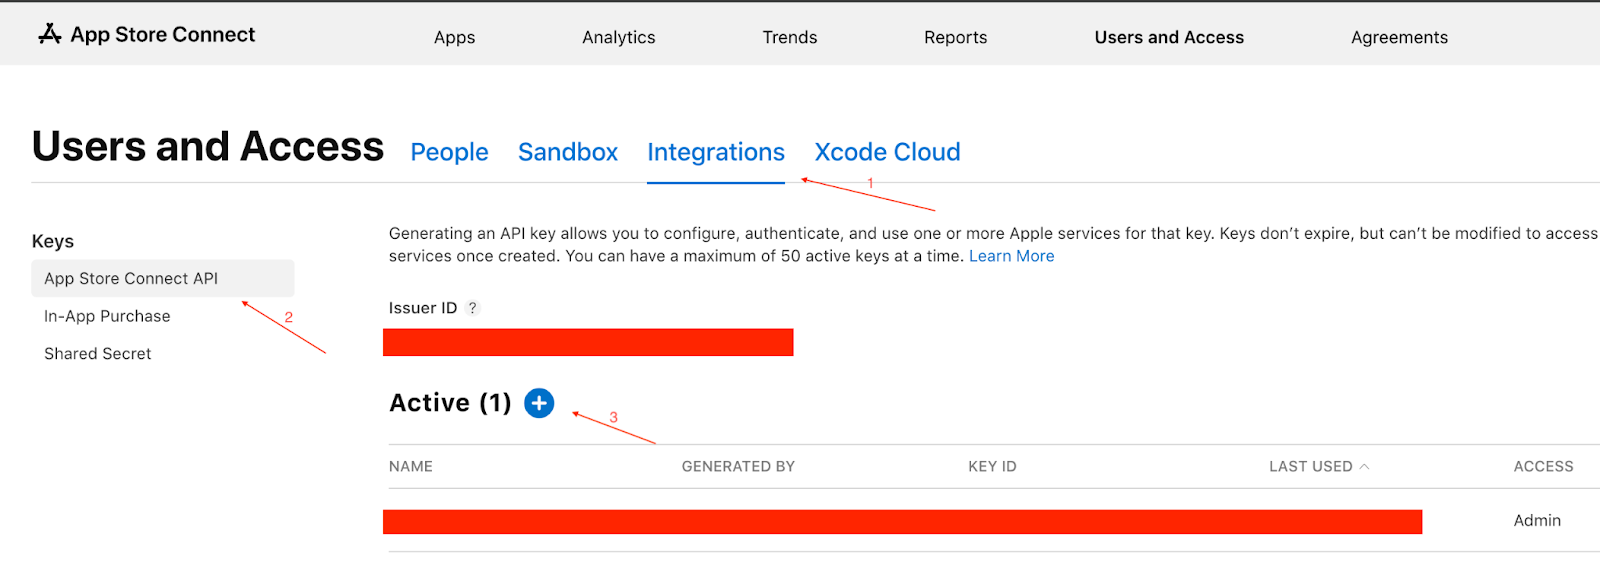
To create an App Store Connect API key, log in to your account in App Store Connect, select the "Users and Access" tab, then select "Integrations" and then "App Store Connect Api" from the menu on the left. You should be able to create a new key by pressing the large blue + button
You can find Issuer ID above blue + button. It is a unique identifier that represents your Apple Developer account and is used in conjunction with API keys to authenticate API requests.

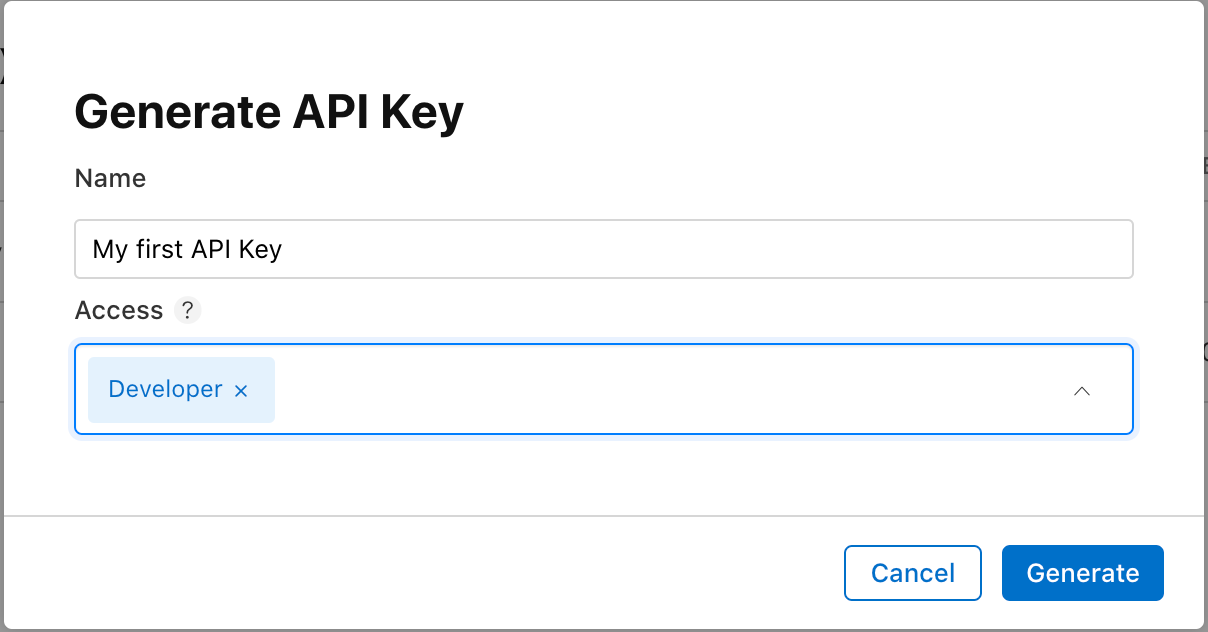
Provide its name and the access level you want to give it. The “developer” level will be sufficient.

Match password & match git authentication
- Match password - it’s a passphrase you entered as a first step after entering the “fastlane match” command.
- Match git authentication - private part of SSH key that build agent will use to authenticate on certificates repository. If you don’t have one already you need to create a new SSH key (you can read how to do it here).
Workflow file
Now go to the yaml file that we created in a previous article. You can find it in the directory “/pathToYourProject/.github/workflows”. If you don’t have it, you can create it in terminal by opening main project folder and entering command
mkdir .github && cd .github && mkdir workflows && cd workflows
Inside, create a workflow file. You can name it “build-upload-ios.yml”Your workflow file should look like in this gist. Below I divided it into smaller parts and described each of them.
name: iOS build & upload

on:
 push:
   branches:
     - 'main'

jobs:
  build:
    runs-on: macos-latest
    steps:
      - uses: actions/checkout@v2
      - uses: maxim-lobanov/setup-xcode@v1
        with:
            xcode-version: latest-stable
      - name: Set up ruby env
        uses: ruby/setup-ruby@v1
        with:
          ruby-version: 3.3
          bundler-cache: true
This part was already described in a previous article. Only the name of action has changed to “iOS build & upload” as it better describes what our pipeline will be doing.
name: Build & upload iOS binary
        run: bundle exec fastlane ios build_upload_testflight
        env:
          ASC_KEY_ID: ${{ secrets.ASC_KEY_ID }}
          ASC_ISSUER_ID: ${{ secrets.ASC_ISSUER_ID }}
          ASC_KEY: ${{ secrets.ASC_PRIVATE_KEY }}
          MATCH_GIT_PRIVATE_KEY: ${{ secrets.MATCH_GIT_PRIVATE_KEY }}
          MATCH_PASSWORD: ${{ secrets.MATCH_PASSWORD }}
This step uploads the iOS app binary (IPA file) and dSYM file (it is a debugging file that contains symbol information to help interpret crash reports by mapping memory addresses back to the original source code) as artifacts. It uses the built-in actions/upload-artifact@v2 action to achieve this. The name parameter specifies the artifact name as "app-store ipa & dsyms", and the path parameter defines the locations of the IPA and dSYM files within the workspace to be uploaded.
Configuring Fastfile
Your fastfile should look like in this gist.
The goal is to:
- Load App Store Connect API key information from environment variables.
- Load the API key.
- Set up the CI environment.
- Retrieve provisioning profiles and certificates using Fastlane Match.
- Build the app.
- Upload the app to TestFlight.
Let’s split it into smaller parts.
platform :ios do
This begins a block of configurations and actions that are specific to the iOS platform.
before_all do ENV["FASTLANE_XCODEBUILD_SETTINGS_TIMEOUT"] = "120" end
Here, we set FASTLANE_XCODEBUILD_SETTINGS_TIMEOUT to 120 seconds.
This configuration extends the timeout period for Fastlane when it interacts with Xcode's build processes. By setting it to 120 seconds, we're allowing extra time for Fastlane to retrieve build settings, which can be useful for larger projects that require more time to process.
desc "Load ASC API Key information to use in subsequent lanes"
  lane :load_asc_api_key do
   app_store_connect_api_key(
     key_id: ENV["ASC_KEY_ID"],
     issuer_id: ENV["ASC_ISSUER_ID"],
     key_content: ENV["ASC_KEY"],
     in_house: false
   )
  end
This lane loads the App Store Connect API Key. It uses the built-in fastlane command “app_store_connect_api_key”. You can read more about it here.
- “key_id”, “issuer_id”, and “key_content” are read from environment variables. These values are necessary for authenticating with the App Store Connect API.
- in_house: The App Store Connect API can't currently distinguish between App Store and Enterprise teams. To work around this, the "app_store_connect_api_key" action and Fastlane's API Key JSON format include an optional "in_house" key. This key may be required when using match or sigh.
Now we have all elements that are required to build a top level lane which executes all of the steps.
desc "Build and upload to TestFlight"
    lane :build_upload_testflight do
      load_asc_api_key
      setup_ci
      match(type: 'appstore', verbose: true)
      build_app(scheme: "Your-scheme", verbose: true)
      upload_to_testflight
   end
In this lane, we bring together everything we've set up throughout the article. It invokes all the previously created lanes, builds the app, and uploads it to TestFlight.
- load_asc_api_key - Calls the load_asc_api_key lane that we described above. Makes sure the API key is loaded.
- setup_ci - Creates a temporary keychain specifically for use with match. Switches match to read only mode to not create new profiles/cert on CI. This temporary keychain is automatically removed at the end of the workflow.
- match - Uses fastlane match to fetch the app's provisioning profiles and certificates. verbose: true enables detailed logging.
- build_app - Builds the app using the specified scheme, with verbose logging enabled. Uses gym underneath
- upload_to_testflight - Uploads the new binary to TestFlight for distribution to testers.
Congratulations! You have successfully uploaded your application to Testflight with usage of GitHub Actions! This was the third part of the iOS CI/CD tutorial. In another articles you will learn:
